Gravity Vehicle
| Gravity Vehicle | |||||||
|---|---|---|---|---|---|---|---|
| Type | Engineering | ||||||
| Category | Build | ||||||
| Description | Teams design, build and test one Vehicle and Ramp that uses the Vehicle's gravitational potential energy as its sole means of propulsion to reach a target as quickly and accurately as possible. | ||||||
| Event Information | |||||||
| Latest Appearance | 2022 | ||||||
| Forum Threads | |||||||
| |||||||
| Additional Resources | |||||||
| Image Gallery | Link | ||||||
| Official Resources | |||||||
| Website | www | ||||||
| Division C Results | |||||||
| |||||||
Gravity Vehicle is an event that returned for the 2020 and 2021 competition seasons after being held in 2012 and 2013. In this event, competitors design and build a ramp and a vehicle that is powered solely by the vehicle's gravitational potential energy.
The Competition
Event supervisors will designate a distance between 9-12 meters as the target distance, or target point. The distance will be in 0.5 meter increments for regionals, 0.25 meter increments for states, and 0.05 meter increments for nationals. The target distance is announced by the event supervisor after impound period is over. The start point consists of a piece of tape, 2.5 cm wide, and extending 50 cm to either side of the start point. Timing lines are placed at the 0.5 meter and 8.5 meter lines, to count towards the time portion of the score. As of the 2020 and 2021 rules of the event, the vehicle does not need to curve around a bucket or cans.
Participants are given 10 minutes to complete up to 3 runs, as well as a variety of adjustments to the vehicle and ramp. Often times, participants clean and measure the track. Using dry-clothed swiffers are common in competitive competitions. Alignment tools may be used to align the vehicle on the ramp, and the ramp on the floor, but must be removed before the run if on the track.
Construction
The Ramp
A ramp is used to convert the gravitational potential energy of the vehicle into forward motion. Although it is not necessary, some teams may find it beneficial to construct an adjustable ramp. One way to do this is by hinging your ramp at the front end (the area that touches the floor) and using supports of various heights to raise the back end, resulting in different slopes. Also available is the system that is used on pool chairs, although it may be more complex to build. It is also possible to have multiple starting positions on a static ramp, which allows for the convenience of an adjustable ramp without the difficulties.
The surface of your ramp must provide enough traction to avoid wheel slippage without being so tacky that the wheels stick to the ramp and provide drag. In order to have the best surface, you want any material that is smooth enough to not damage your wheels but has enough to friction to not let them slip. Some materials to keep in mind are:
- Plastic (flimsy, very low level of friction)
- Metal (more rigid than plastic, offers similar level of friction)
- Wood (smooth wood is rigid, and decently smooth. May also be easier to work with)
- Plexiglass (flimsy if using thin sheets, similar friction level as plastic)
Please note that if the surface of the ramp is too slippery and the wheels of the vehicle lack grip on it, then the vehicle may have problems with the straightness of its path.
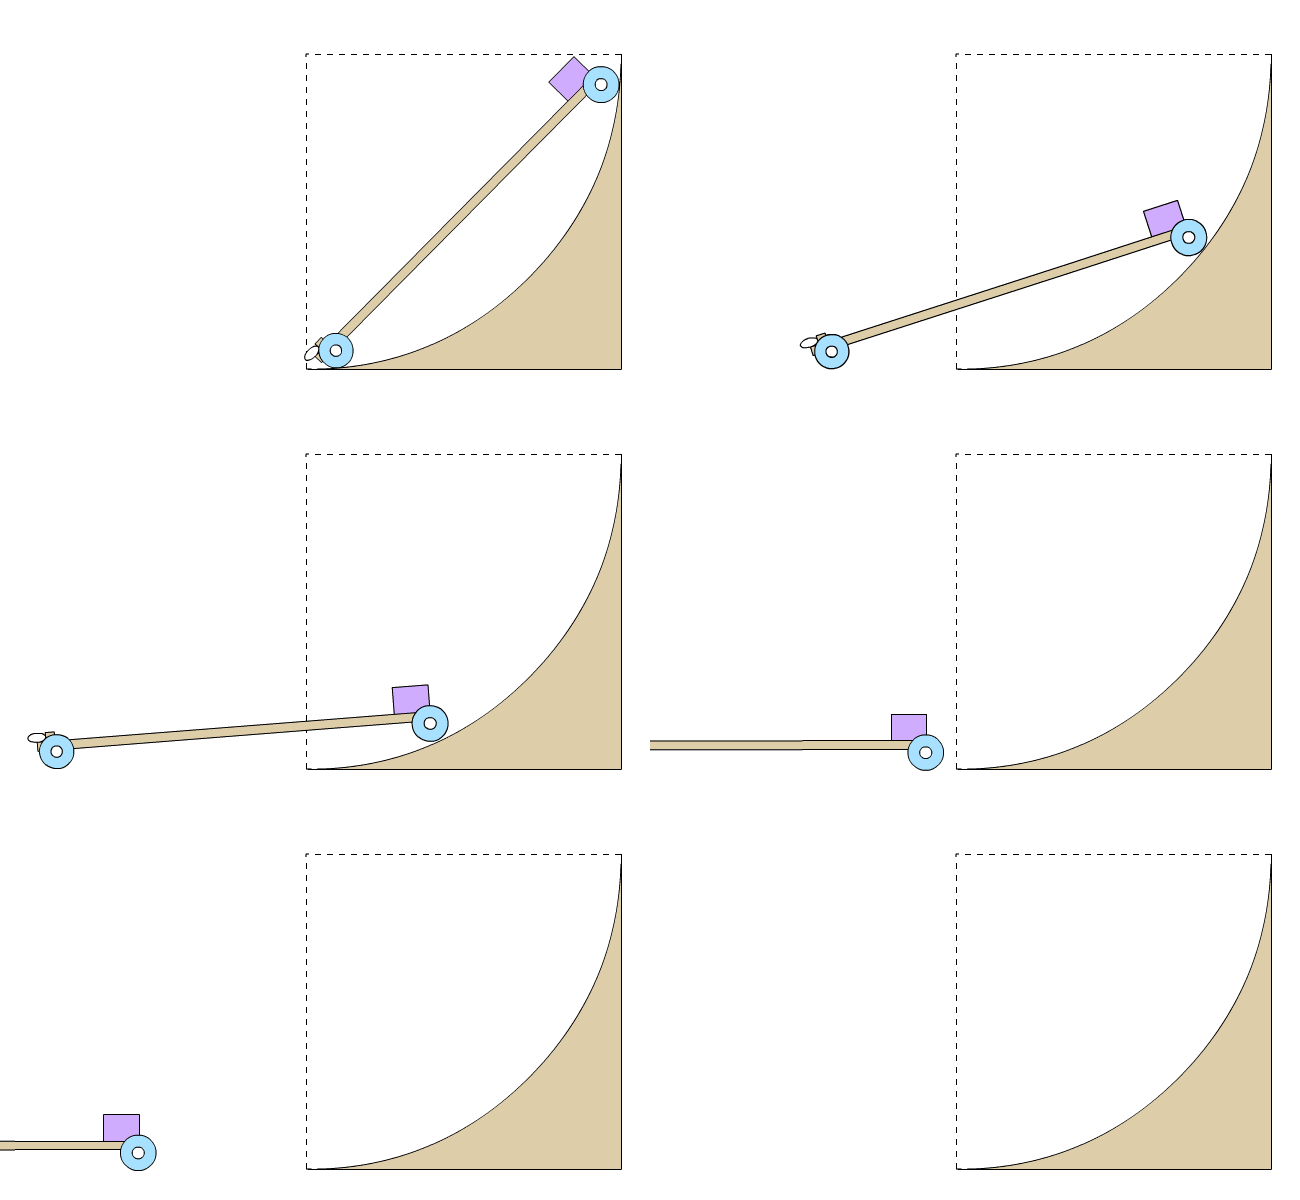
Ramp shape will affect your performance to some extent. A flat ramp without any curve is the easiest to construct, but a vehicle may lose some forward momentum, or even change course, depending on the angle at which the ramp meets the floor. Another possible shape would be the Brachistochrone Curve. A ramp in this shape could be difficult to construct, but it may provide the best transfer angle from the ramp to the floor. Below is an example of a vehicle on a ramp in the shape of a Brachistochrone curve, courtesy of the Scrambler Wiki. Note that the egg on the vehicle's front is not part of this event:
The Vehicle
Construction of the vehicle will usually be similar to "vehicle" events in the past, like Scrambler, Wheeled Vehicle, Electric Vehicle, and Mousetrap Vehicle. During the construction of the vehicle, attention must be paid to where the mass will be concentrated in order to gain most gravitational potential energy. However, builders must also keep in mind that the location of the mass will also affect vehicle skid during braking, which could impact the accuracy of the vehicle.
The Chassis
The chassis of your vehicle will need to be rigid and well built. Unlike years past, the 2020 and 2021 events call for a propulsion method that will place a great deal of stress on the frame. Therefore it is crucial to build a solid structure. A flimsy chassis will result in an unpredictable path, and possibly even vehicle damage, leading to a loss of points. The chassis can be built either as four walls or simply just one flat board. Some materials for the chassis are:
- Wood
- Metal
- Plexiglass
- Plastic
- Carbon Fiber
- 3D Printed Parts
Some materials will work better than others, and a combination may work best. When building the chassis, ensure that the vehicle will have right angles and that the axles will be situated perpendicular to the direction of travel. This is crucial to prevent your vehicle from curving, which could have effects ranging from a minor change in the stopping point to causing the vehicle to fall off of the side of the ramp or to crash into a wall. An adjustable steering system may be helpful if the chassis cannot be built straight, or if the competitors foresee a rule change requiring the vehicle to curve or plan to reuse the vehicle in an event that might require a curve.
From the Mousetrap Vehicle page, "If you cannot build the axles to be exactly parallel, then there are some other options. One commonly used solution is to build the car in two halves. The front axle will be part of the front half, and the rear axle will be attached to the back half. The two halves of the vehicle are connected together with a bolt that runs to the middle. To adjust the path of the vehicle, simply loosen the bolt, turn the front half, and lock it in place by tightening the bolt again. Now you can adjust how straight or arched the path of your vehicle is!"
Axles
Axles connect your wheels to your chassis. They will need to be non-flexible and stiff. A crooked axle will greatly affect the path of your vehicle. Materials for the axles include:
- Wooden dowels
- Brass/Aluminum rods
- Plastic dowels
- Carbon fiber rods
When attaching your axles to the chassis, you have multiple options. One common method is to simply drill a hole in the walls of your chassis, and simply insert the axle into these holes. Another popular method is to use some sort of sleeve, like a straw, attach the sleeves to the chassis, and then place the axle inside these tubes.
One thing to note though, is that with this event, the vehicle will endure more stress and will carry more weight than in years past. Thus, it will be most beneficial to use ball bearings this year. You can find them in skateboards and in-line roller blades, or you can purchase them individually. Quality bearings will improve your time score and can also help in ensuring your vehicle follows a straight path. It is also important to note that a faster vehicle may not always be better, as if your vehicle is too fast, its skid may be unpredictable. Remember that accuracy and precision is more important than speed.
Wheels
The wheels will need to be straight as well as light-weight (for the front) and strong (for the back.) There are multiple things to consider when choosing wheels. For example, thick or thin? Large or small? 3 or 4? The answer will depend on your ramp design and vehicle. Common choices for wheels are:
- CDs
- Hobby airplane wheels (like these)
- Wheels from companies like BaneBots are common within very competitive teams, but are relatively expensive.
- Home-made wheels
The last option is not recommended unless you have the proper tools and abilities to make perfectly circular wheels. Friction is your enemy when it comes to axles. A necessary option is to use ball bearings and they are not difficult to find. The pay-off is incredible because the negligible increase in weight of the bearings does nothing negative while your time score will improve drastically. Another idea might be to use some sort of sleeve to hold your axle, and apply either liquid or graphite lubricant to the area (not recommended.) Be careful not to overdo the lube, or else you'll end up with a sticky mess that will attract large amounts of dirt. A great idea is to cut a strip of latex balloon, and wrap it around the circumference of your CD wheels. It will provide a nice amount of traction. If you are using wheels in the front, they need no balloons to operate optimally.
Brakes
A good braking system will stop your vehicle on the mark, with precision and accuracy. Skid is a factor that affects the braking ability and stopping distance. Skid can be fixed by using wheels with more traction. Other ways to reduce skid include lightening the vehicle and lowering the vehicle's starting point on the ramp. Reducing the mass of the vehicle causes it to have less momentum, which then requires less traction to stop the vehicle. Lowering the starting point on the ramp reduces the speed of the vehicle, which also reduces the momentum of the vehicle.
Many braking systems have appeared over the years, and two of the most common are the ones listed in the following excerpt from the Scrambler Wiki:
Braking Systems
There are two commonly used braking systems. Here they are listed in order of difficulty of construction.
String Type
| Pros | Cons |
|---|---|
| Easy to build | Poor Accuracy |
| Backlash | |
| Skid |
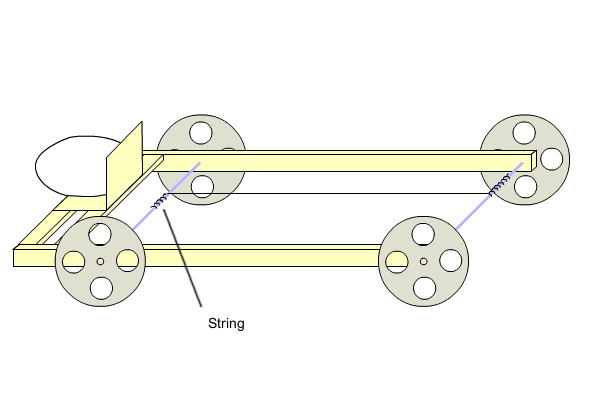
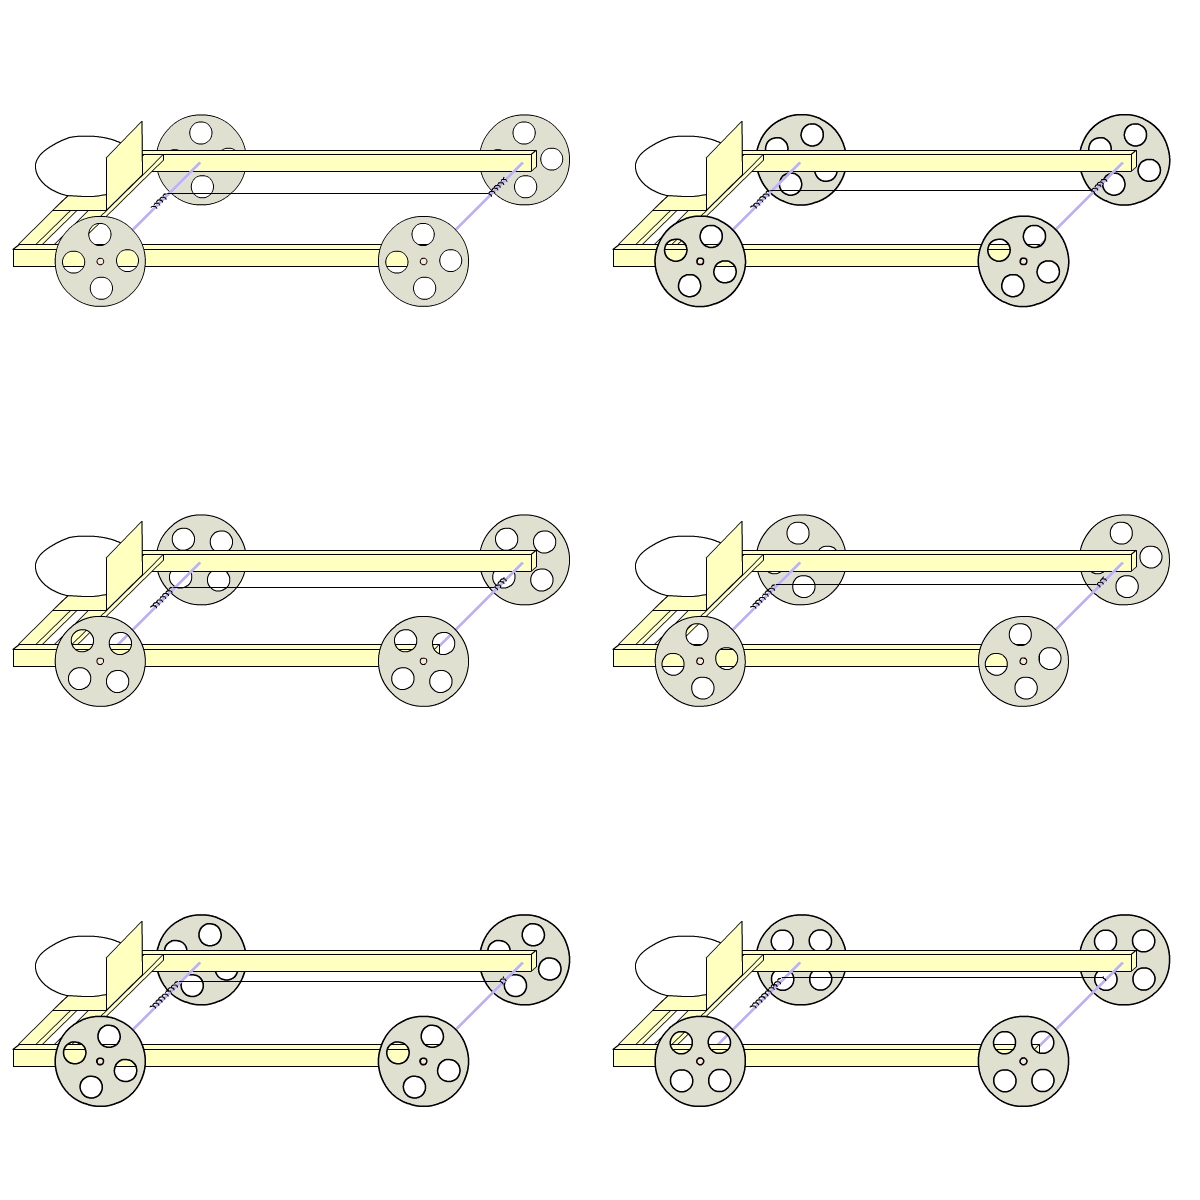
The first braking design is made by running a string from one axle to another. As the car travels, the string from one axle unwinds and wraps around the second axle. Once all of the string has fed through from one axle to the another the axles lock and the car stops. The distance the car travels can be controlled by the amount of string wrapped around each axle. This design tends to have poor accuracy for several reasons. First, the string used will often stretch in an irregular way. Second, the string will not always wrap in exactly the same manner, meaning there is a slight variation in the amount of travel allowed before stopping the car. Third, while the taut string will prevent the car from moving forwards, nothing prevents the car from moving backwards. So, you will get some amount of backlash. This system relies on the braking power of the rims of the wheels, which may lead to skid, as this design does not allow for gradual locking of the wheels. That being said, this is the easiest system to implement. So, if you need a quick solution or don’t plan on putting much time in your system, this is certainly an option.
Threaded Rod Type
| Pros | Cons |
|---|---|
| High accuracy | Somewhat complicated to build |
| Consistency | Skid |
| Little to no backlash | Added Friction to the axles |
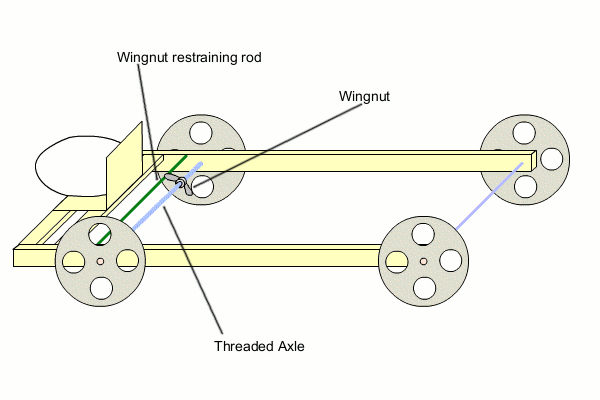
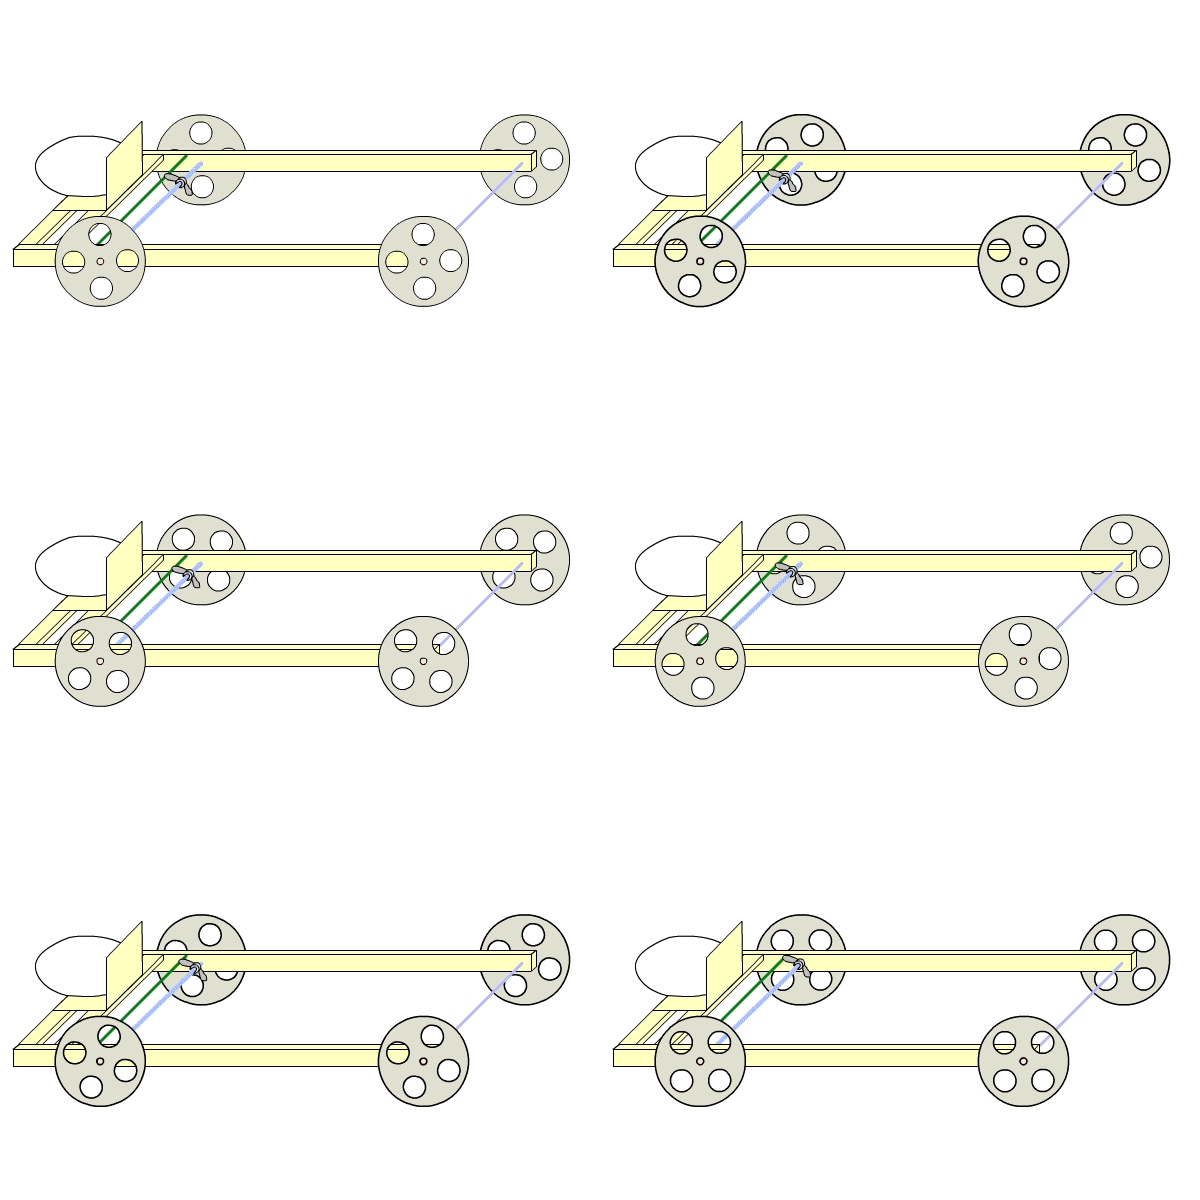
In order to be even remotely competitive, you need to use this system. This system is very popular among competitors. While only slightly more complicated than the string method, it is more consistent. The basic concept of this design is using a threaded rod for the axle, placing a nut (usually a wing nut is used) on the axle. As the wheels rotate their rotary motion is transferred into linear motion in the form of a wing nut moving along the axle. When the wing nut reaches a barrier, it will no longer be able to move, and thus stops the axle from turning. The distance is set by setting how far the wing nut starts from the barrier and is usually measured in rotations of the wheels. While as described the system is still vulnerable to skid, it can be minimized by carefully choosing a material for the barrier that the wing nut engages during the stopping motion. By choosing something rubbery many teams achieved a gradual locking of the wheels, which effectively eliminated any skid inherent to the system. The wing nut also adds some friction to the axle, thus the car may not roll as smoothly or as far.
The above section is from the Scrambler Wiki page. The wing nut system is the most popular method, due to its simplicity and effectiveness. This video is an example of the wing nut system. The easiest method of reducing skid is to reduce the mass of the vehicle. This will reduce your vehicle's inertia, and therefore will reduce the amount of skid it experiences. And having wheels with good traction also helps. If the wheels hop when the brake engages, the easiest fix is to add mass near the axle that has the braking system.
Practice Log
A practice log consisting of 3 or more parameters and at least 10 practice runs must be impounded with the device. The practice log must include the following 2 parameters; the target distance and the vehicle distance from the target. An additional 3rd parameter must be selected by each team. Possible examples of the 3rd parameter include the number of turns of the braking axle, the angle of alignment, the mass of the vehicle, or the starting height of the vehicle on the ramp.
Scoring
The lowest score wins, and negative scores are not possible, due to the lack of a bonus. Scoring is calculated based on the two best scoring runs.
- Vehicle Distance: The vehicle distance is the distance in centimeters from the measurement point to the target point to the nearest 0.1 cm.
To calculate the score, the following formula is used:
Score = 1 × (Vehicle Distance, in centimeters) + Penalties
In 2019-2020, run time was implemented. The scoring for that season was 2 * distance + time. However, time was removed in the 2020-2021 season.
Penalties
No tiers have been implemented for the 2021 Gravity Vehicle rules. However, penalties will be given out for competition and construction violations. This is similar to the rules for Scrambler 2017.
Competition violations result in a 1500 point penalty. Construction violations result in a 3000 point penalty.
Tiebreakers
Tiebreakers are as follows:
- Better Vehicle Distance of the 2 scored runs
- Better Vehicle Distance of the non-scored run
General Tips
- Before starting you build, it is crucial that you have an idea of where you want to go. Don't pick up your materials and throw something together on the fly. Having a good plan will almost always work better than not having a plan.
- Most of your time should be spent making and modifying your vehicle. It is crucial that you test your vehicle, but it is even more important that you are not wasting time testing an inferior device. Ensure that it is consistent and accurate.
- A great idea I've used in the past is to test on many surfaces. You will not be 100% sure about the competition surface, so it is best to test your vehicle on many surfaces such as gym floor and hallway tiles.
- Clean the floor before your run at competition, and while you practice. This will allow you to keep dirt and dust from affecting the stopping ability of your vehicle. Note: this will decrease the chance of skidding, but may cause your car's braking wheels to hop a few times when the brake engages, decreasing accuracy. A way you can limit this, however, is placing weight over your braking axle. This will increase the friction between the wheels and the ground, thus decreasing skid.
- You can use mathematical calculations to determine the amount of turns that will be needed for the wingnut if you are using the "Threaded Rod" system. Measure the distance from the starting point of your vehicle to the finish mark. Divide this by the circumference of your wheel, and then you have the number of turns that are needed. However theoretical calculations are no substitute for hands-on testing.
- As you test on each surface, keep data in the form of a chart. This allows you to accurately replicate your vehicle's performance for the day of competition.
There are functions for time and distance and the inaccurate times are highlighted in order to be ignored during LSRS calculation.
- Another way to calculate the number of turns you need for a given distance is to pick a random number of turns then see how far your vehicle went. Repeat that at least 10 times, picking different numbers for axle rotations, and record the data. From that data, you can create a line of best fit that will give you accurate results.
- Consistency is key! Make sure you can replicate every single detail of your setup from run to run. (eg ramp angle, axle turns, how the vehicle hangs on the ramp etc)


