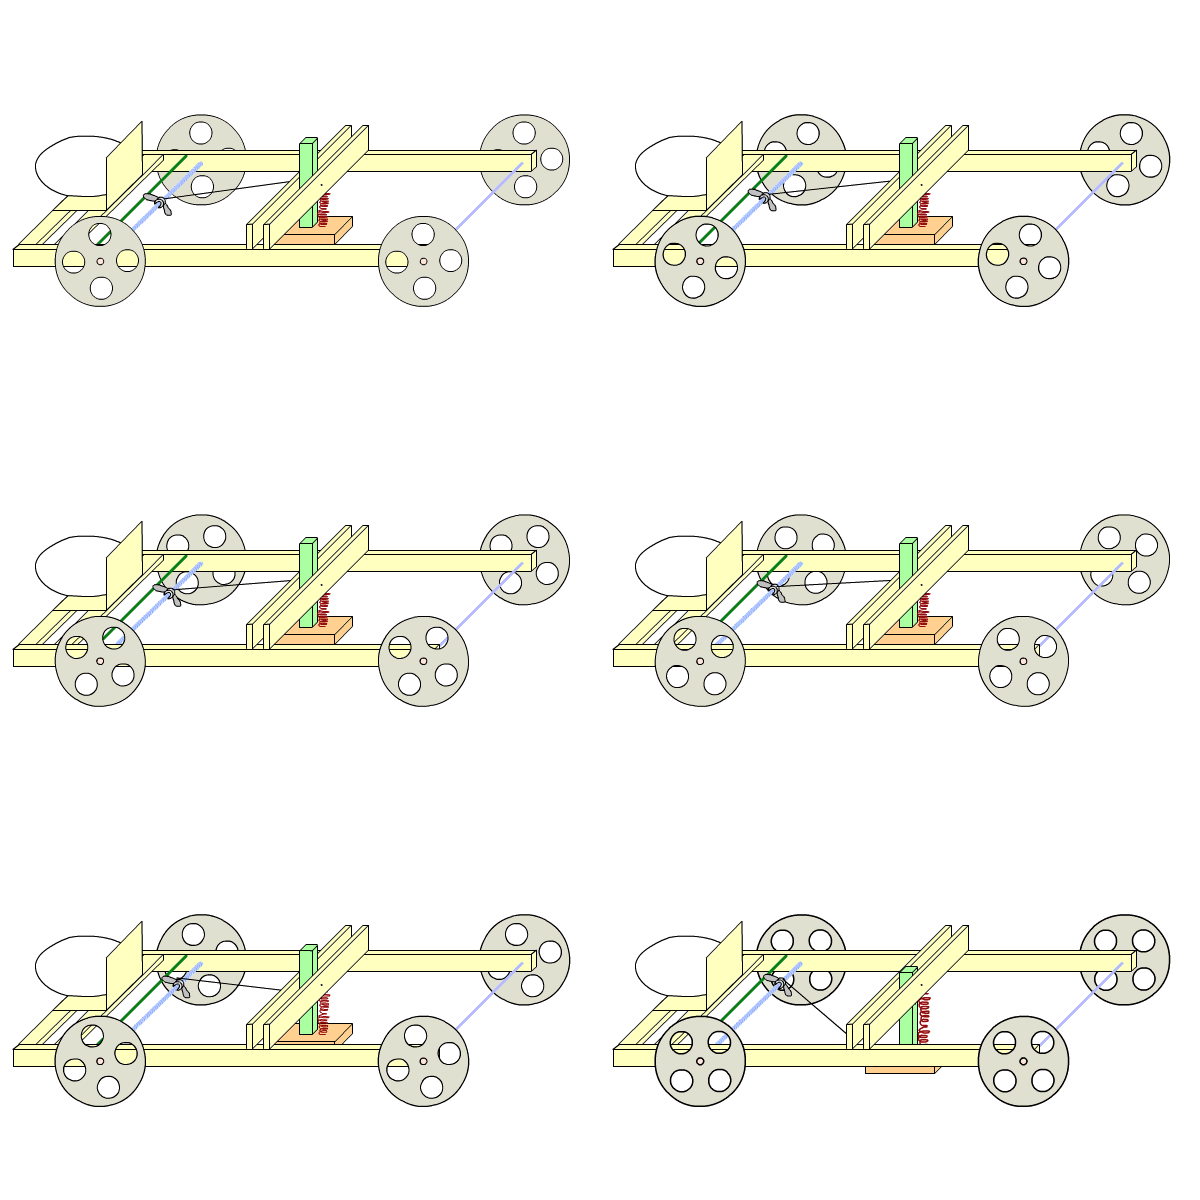
Scrambler
| Scrambler | |||||||
|---|---|---|---|---|---|---|---|
| Type | Engineering | ||||||
| Category | Build | ||||||
| Event Information | |||||||
| Latest Appearance | 2023 | ||||||
| Forum Threads | |||||||
| |||||||
Scrambler is a Division C event for the 2023 season. It was previously held as a Division B event in the 2016 and 2017 seasons. The event involves building a device that transports an egg a certain distance to be as close to a final barrier as possible, without hitting the barrier.
The Event
The event involves designing and building a device known as a Scrambler that consists of an Egg Transport Vehicle (ETV) and an Energy Propulsion System. These functions may either be separate or combined into a single unit. The Energy Propulsion System consists of a falling mass that propels the ETV as quickly as possible along a straight track, with the ETV stopping at a specified distance along the track. The entire device, including the mounted egg must be shorter than 0.90 m in every dimension (length, width and height).
Parameters
In the 2017 rules, the ETV must travel a minimum of 8.5 m, staying within a 2 meter track width before coming to a stop as close as possible to a terminal barrier (TB). The ETV must be made of rigid, non-flexible material. Any stopping mechanism must be contained within the ETV itself, and must work automatically. The Energy Propulsion System must obtain energy from a falling mass no heavier than 2 kg. The mass does not need to travel with the ETV, and the vehicle cannot contribute to the mass. Any part of the Scrambler that provides energy to propel the ETV is considered to be part of the falling mass. Parts of the mass must be detached at impound.
The ETV must be started by using any part of an unused #2 pencil provided by the event supervisor. The pencil can be used in a number of ways - it can actuate a release mechanism or be incorporated into the Scrambler itself so that when released, the mass falls. The Scrambler must also be set up so that when it is ready to run, a team member can walk away and the mass does not fall. The Energy Propulsion System may be held in place to stabilize it during launch, but it should be able to remain in its starting position without being touched. In the 2017 version of the rules, the only parts of the Scrambler that may contact the floor are those already in contact with the floor while the Scrambler is in this ready to run position. All wheels must be in contact with the floor at launch (meaning that ramps cannot be used), and any detaching parts result in a construction violation. No electronic or electrical devices may be used on the Scrambler or to align the Scrambler.
Event supervisors will provide large uncooked grade A chicken eggs to competitors, who must select an egg for use immediately prior to the 8 minute setup time. Supervisors will also provide tape for attaching the egg to the ETV. No tape may be on the front or rear 1.0 cm of the egg. The egg must be at the front of the ETV, with the rounded end touching the backstop and being visible to the supervisor once attached. In the 2017 rules, the egg must rest on two 1/4" wooden dowels up to 4 cm long that are perpendicular to a rigid and flat backstop. The bottom of the dowels should be anywhere from 5 to 10 cm above the track and within 1 cm from the bottom of the backstop. The backstop must be 5 cm wide and 5 cm high, as well as half an inch thick. The backstop should be perpendicular to the floor and have a vertical 1/4" wooden dowel attached to the top. This vertical dowel must extend at least 20 cm above the track surface. A diagram of the backstop can be found here.
Competition
The track that the device travels along is built on a smooth, hard, level surface with a terminal barrier (TB) across one end. In the 2017 version of the rules, tape pieces approximately 2.5 cm wide are located at the 0.5 m line, the 8.5 m line, and track width lines from the start point to the TB. The device cannot leave these track width lines at any point during a run. The center of the TB is marked, and the start point is marked by a 2.5 cm by 5 cm piece of tape centered between the track width lines. A 5 gallon bucket with a bottom diameter of 25-27 cm is placed at the center point between the start point and the center of the TB. The TB itself must be at least 25 cm tall and perpendicular to the rest of the track, resting at least 9-12 m away from the start point. This distance is changed in 1 meter intervals at the regional level, 0.25 meter intervals at the state level, and 0.10 meter intervals at the national level. Both the distance and the bucket diameter are announced prior to the impound period.
Competitors have 8 minutes to complete two runs, transporting the egg a specified distance to the terminal barrier. Teams may use the time given in any way necessary, including making adjustments to the Scrambler, cleaning the track, or aligning the Scrambler. However, teams may not roll the ETV along the track the day of the event without direct permission. If this is allowed, only team members may be present. At the start of a run, the pointed tip of the egg must start on the start point, though other parts of the Scrambler may be in front of the start point. Any alignment devices placed on the track must be removed before a run begins, though mounted alignment devices may or may not be removed. If the ETV does not move when the Scrambler is activated, the run does not count and the device can be reset. However, no additional time is given.
The timing of a run begins when the ETV passes the 0.5 m line and ends when it stops or passes the 8.5 m line, whichever comes first. This time counts towards the 8 minute total, but the time that it takes for an event supervisor to record measurements does not. Competitors may not retrieve the ETV until the event supervisor clears it, and they may not follow the device down the track. A run fails if time or distance cannot be measured for a run (e.g. if the device is started before the supervisor is ready), a part of the ETV passes the TB, or if a second run is not completed within the 8 minute time period.
Scoring
The lowest score wins, and is calculated based on three factors:
- Run Time: defined as the time the car takes to travel from the 0.5 meter line to the 8.5 meter line, or from the 0.5 meter line to when it stops.
- Distance Score: measured from the tip of the egg to the center of the TB to the nearest 1/10 of a centimeter. In 2009, 2014 and 2015, the Distance Score was measured diagonally from center of the wall to point of egg to the nearest millimeter, while in previous years it had been measured perpendicularly to the wall.
- Penalties: Penalties can occur in a variety of ways, resulting in points being added to the score.
Previous years have also included a bonus score of -100, earned if the competitors can successfully pass their ETV around the left side of a #3 can (placed halfway along the track to the terminal barrier, offset .5 meters left of the center of the track) while remaining within the track the entire run. To calculate the final score, simply add the three factors together. The Final Score is equal to the better of the two run scores.
Event supervisors must review score data with teams during the event. Ties are broken as follows:
- Better non-scored Run Score
- Faster Run Time on the scored run
Penalties
Penalty points may be earned for five reasons: failing to impound the Scrambler or its practice log, impounding an incomplete practice log, competition violations, or construction violations. Teams that do not complete a run or complete two failed runs gain participation points only.
Failing to impound the Scrambler results in a penalty of 10,000 points, while teams without an impounded practice log earn a penalty of 500 points. Incomplete practice logs earn 250 penalty points.
Competition violations occur if the competitor follows the ETV down the track, the ETV touches the track width lines, or if the ETV stops before the 8.5 m line but after the 0.5 m line. Competition violations also occur if any part of the ETV touches the TB before the egg does, or if the egg breaks during a run. A break is defined as cracking the egg enough to leave a wet spot on a paper towel, resulting in the distance score being taken from the point of impact to the center of the TB. If the egg breaks on the first run, no further runs are permitted. Teams may obtain a second egg if the first egg breaks before a run begins, though penalty points are still given. Competition violations give 1,000 points each, up to 4,000 points.
Construction violations occur if parts detach from the ETV during transit or if other construction parameters are violated. Construction violations give 5,000 points, up to 15,000 points.
General Event Suggestions
Firstly and arguably most importantly, competitors should read the rules before starting to build. There is nothing more embarrassing to a team than to be disqualified, or moved down a scoring tier, simply because they did not read the rules. Memorize the rules, have the persons who are building it be able to recite the rules verbatim, hold quizzes if necessary. Always check for clarifications on the National Science Olympiad website. When in doubt, submit a clarification request or have your coach contact the event supervisor. There is never a need to stay in the dark when it comes to the rules.
As with any building event, it is always beneficial to plan out a design before building it. Not only will it allow for a more efficient use of raw material purchases, but it may save you some embarrassing rule violations. Again, make sure to check a design against the rules.
Also, this event is characterized by testing. Even the best, most perfect scrambler will fail if it was not tested sufficiently. How does one know when it is tested sufficiently, you ask? Well, if you need to ask, then it is not. You should go and test more. Make sure both people who are doing the event are present during practices; humans are imperfect machines and sometimes get sick during the competitions. Keeping logs is very helpful also, it will allow one to accurately determine what effect adjustments have on a scrambler's performance.
Lastly, this event is well-simulated by the laws of physics. This is a rarity in building events, and definitely should be taken advantage of for Division C. Talk to a physics teacher, search the Internet for the appropriate physics concepts, find equations and use them. This article will attempt to introduce some of these concepts, but additional work definitely helps.
General Construction Suggestions
When one looks at the scramblers in a competition, it becomes apparent that some are better built than others. At the competition, the better-built scramblers tend to do better than the ones that are built poorly. The material in use should be straight and sturdy; many teams fail when their cars are bent out of shape by the forces of acceleration (this especially applies to malleable materials like metal and plastic). While it often makes sense to create designs that are collapsible for easy transport, many teams that use such designs are plagued by loose tolerances that were imposed on them, often failing to have their scrambler stay in the 1.5-meter lane. If you use wood, always use screws and glue. Nails are much harder to remove and manipulate. When using metal construction kits, make sure everything fits.
Any construction style must always be balanced between adjustability and stability. For instance, while covering every joint with glue may increase durability, it will make a car very rigid and unchangeable. Adjustability is very important, as few teams perfect their designs on the first try, and one should always consider that when choosing a bonding method. In theory, it is always possible to add an extra pair of screws, or even add a nut and bolt fastener and achieve the same stability as a dab of glue. When in doubt, and where weight does not matter, choose fasteners instead of glue.
Tip: Wood is preferable over breakable materials such as K-nex!
Course Deviation
Having a scrambler that runs straight and true is very important, within limits. A 10cm deviation from center over a 10m course is caused by being just 0.57 degrees off course. Half a degree accuracy is more than can be reasonably expected at competition. Course deviations can cause problems with breaking accuracy by changing the distance between the launcher and the wall. Luckily, at 10m, a deviation of 14.1cm results in a change of only 1mm in the distance. Teams should strive to aim as straight as possible because the rules are that distance is measured from center of the terminal barrier. To do this, many teams utilize protractors aligned at the start line.
Common Components
This section contains some physics concepts in areas. The physics is intended to help in the design of the device, especially for Division C competitors, and is not a required part of the event.
While varied, most devices used for this event share some general parts.
Wheels
The wheel is one of the most critical components of the ETV. There are several properties of the wheel that are important to consider for the purposes that it is used in this event.
Material Considerations
Given the limited budgets of most teams, physics has to be eclipsed by the availability of the materials. Most teams use some pre-made disks for their wheels, for example, CD/LP based wheels. Some use roller blade wheels. Better funded teams may wield custom made acrylic wheels, or even those cut from sheets of balsa.
Reducing weight
Lighter wheels are generally better (see physics explanation below). Therefore, given good drilling equipment, it is advisable to drill a series of holes in the wheel to make it lighter. Take care to do it in a symmetrical fashion, and not to weaken the wheel too much. By the physics, the greatest effect shall be seen from reducing the weight of the rims of the wheel. Look at the professional wheels for guidance. For example, high-speed bicycles often have very efficient designs for their wheels.
Most designs drill up to four holes on each wheel, all of the same sizes. Drilling holes work well with materials like Plexiglas, milled aluminum, steel, etc. However, it does not work with materials like CD and fibrous alloys because it ruins the structural integrity of the wheel.
Friction in the wheel
To reduce the axle friction, teams use ball bearings. These gadgets, while sometimes expensive and tough to find, will often nullify any problems associated with small wheels. Keep these free from dust and well lubricated with grease or other lubricants.
To increase traction, many teams use rubber bands around their wheel rims. Latex gloves as a faster and easier alternative to rubber. The rules prohibit any lasting glues from being used for traction purposes.
In general, it is good to make sure that the wheels are straight, the axles are straight, and the bearings are mounted square to the ETV's chassis. This helps the ETV move in a straight line.
Physics Theory of the wheel
Below is the theory of physics of the wheel, which may help in the design of the device.
The wheel's mass, specifically its rotational inertia, is one of the most important for an ETV: the rotational energy of the wheel does not accelerate the ETV forward. Let [math]\displaystyle{ \omega, v, r, m, I }[/math] denote the angular velocity, translational velocity, radius, mass and moment of inertia of the wheel, respectively. Since [math]\displaystyle{ \omega = \frac{v}{r} }[/math] and [math]\displaystyle{ I=mr^2 }[/math] if we approximate wheels as hollow cylinders,
Therefore, given a constant starting energy, an increase in mass will cause the ETV to have less translational kinetic energy. Since [math]\displaystyle{ m\propto r }[/math], smaller wheels make the ETV go faster. Wheels that are solid disks have a moment of inertia of [math]\displaystyle{ I=\frac12mr^2 }[/math], but have much more mass and are therefore ineffective.
Larger wheels have benefits, too. Smaller wheels allow for your ETV to move faster, but they are more susceptible to axle friction because the wheel-to-axle ratio is lower. ETV with small wheels may fail to reach the target distance just because of friction. Ways to reduce this friction will be discussed shortly. ETV with large wheels move slower, but at roughly constant speeds. The wheel radius is also important to one of the integrated mass ETV discussed later.
The second important aspect of a wheel in an ETV is its traction. Traction, also known as static friction, is important for the ETV's stability, and when the wheels are used as brakes, for its braking. The friction between the wheel and the ground is static friction unless the wheel is skidding. Since the weight of the ETV is supported by the wheels, the traction is at most
where [math]\displaystyle{ f }[/math] is the force of friction, [math]\displaystyle{ m }[/math] is the mass that the wheel supports, [math]\displaystyle{ \mu_s }[/math] is the coefficient of static friction and [math]\displaystyle{ a }[/math] is the acceleration of the ETV. Beyond the maximum acceleration, the ETV will start skidding.
Therefore, the wheel should have a higher coefficient of friction to increase its maximum possible acceleration before skidding.
Brakes
If the ETV hits the wall at faster than about 1 m/s, the egg is very likely to break. Therefore, once the ETV can travel the required distance, a brake should be used to stop the ETV before it reaches the wall.
Here are three commonly used braking systems, listed in order of difficulty of construction. Wheels with high coefficients of static friction make the brake system more effective because it prevents skidding.
String Type
Pros
- Easy to build
Cons
- Poor Accuracy
- Backlash
- Skid
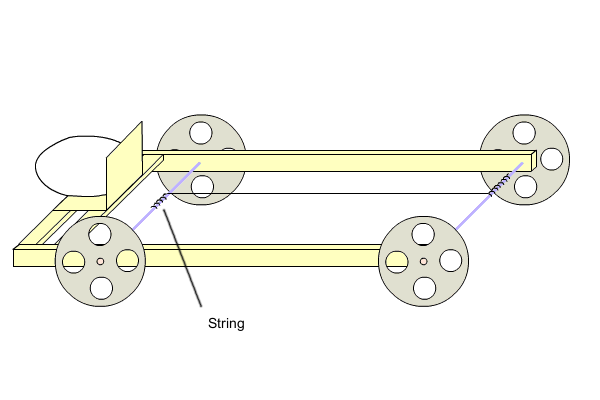
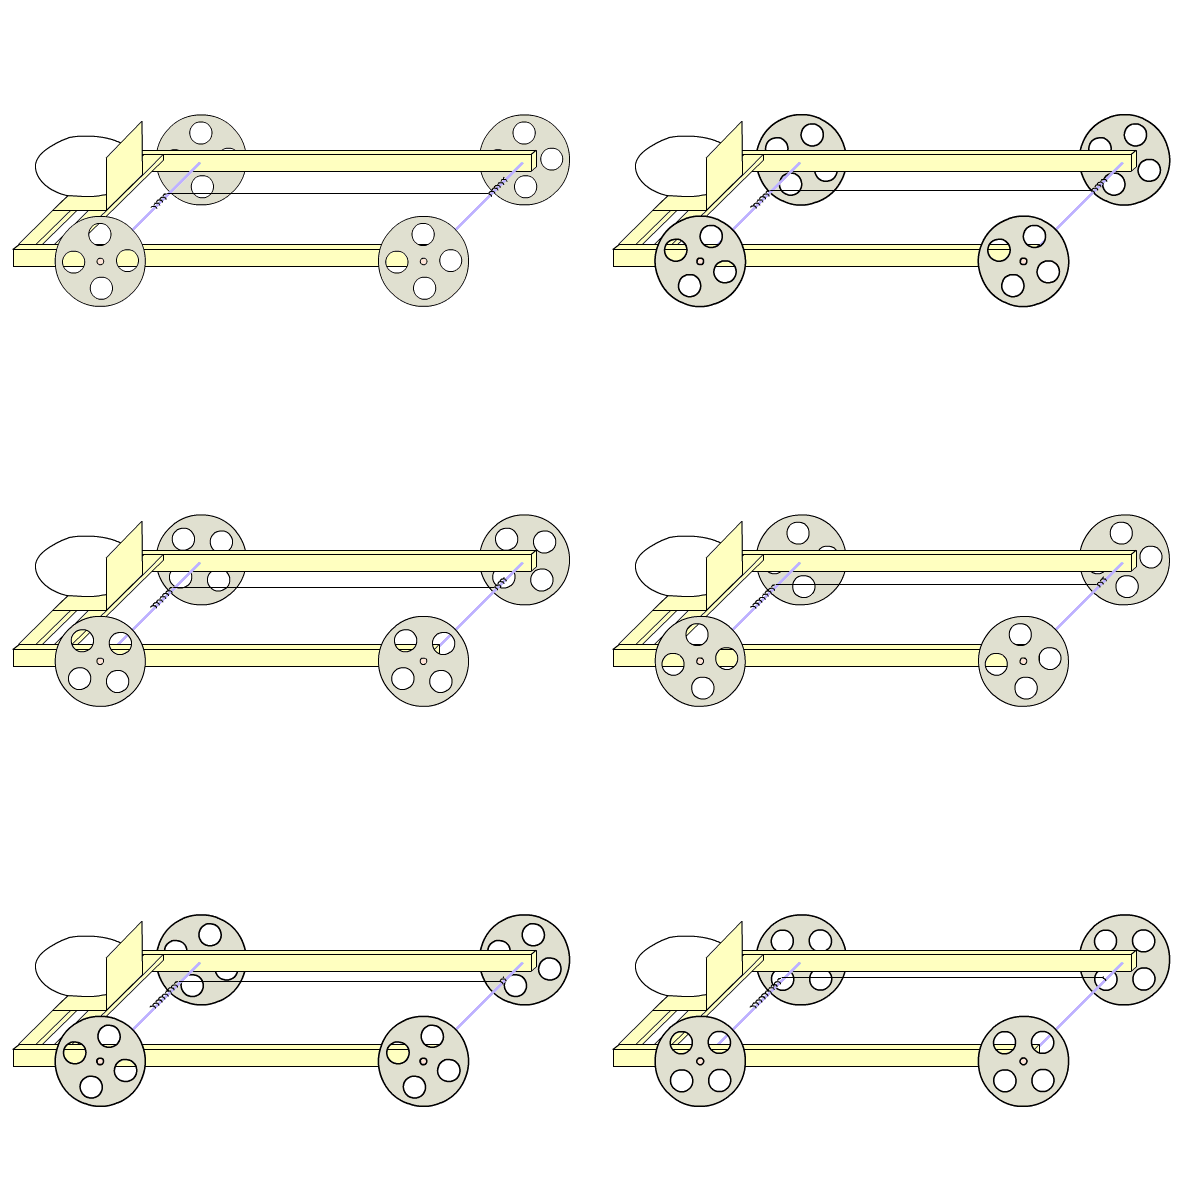
The first braking design is made by running a string from one axle to another. As the ETV travels, the string from one axle unwinds and wraps around the second axle. Once all of the string has fed through from one axle to the another the axles lock and the ETV stops. The distance the ETV travels can be controlled by the amount of string wrapped around each axle.
This design tends to have poor accuracy for several reasons. First, the string used will often stretch in an irregular way. Second, the string will not always wrap in exactly the same manner, meaning there is a slight variation in the amount of travel allowed before stopping the ETV. Third, while the taut string will prevent the ETV from moving forwards, nothing prevents the ETV from moving backward. So, you will get some amount of backlash.
This system relies on the braking power of the rims of the wheels, which may lead to skidding, as this design does not allow for gradual locking of the wheels. That being said, this is the easiest system to implement. So, if a quick solution is needed, this is certainly an option.
Threaded Rod Type
Pros
- High accuracy
- Consistency
- No Backlash
Cons
- Somewhat complicated to build
- Skid
- Added friction to the axles
This system is very common. While only slightly more complicated than the string method, it is more consistent.
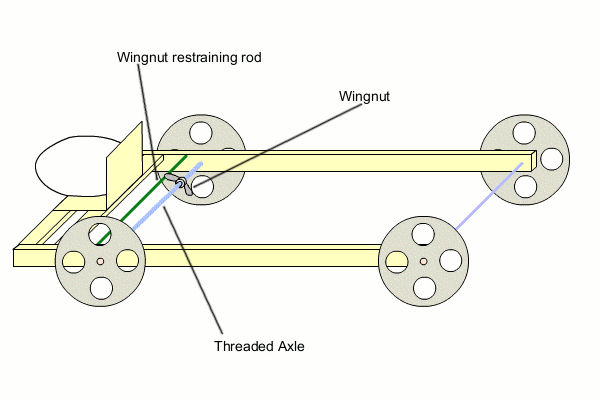
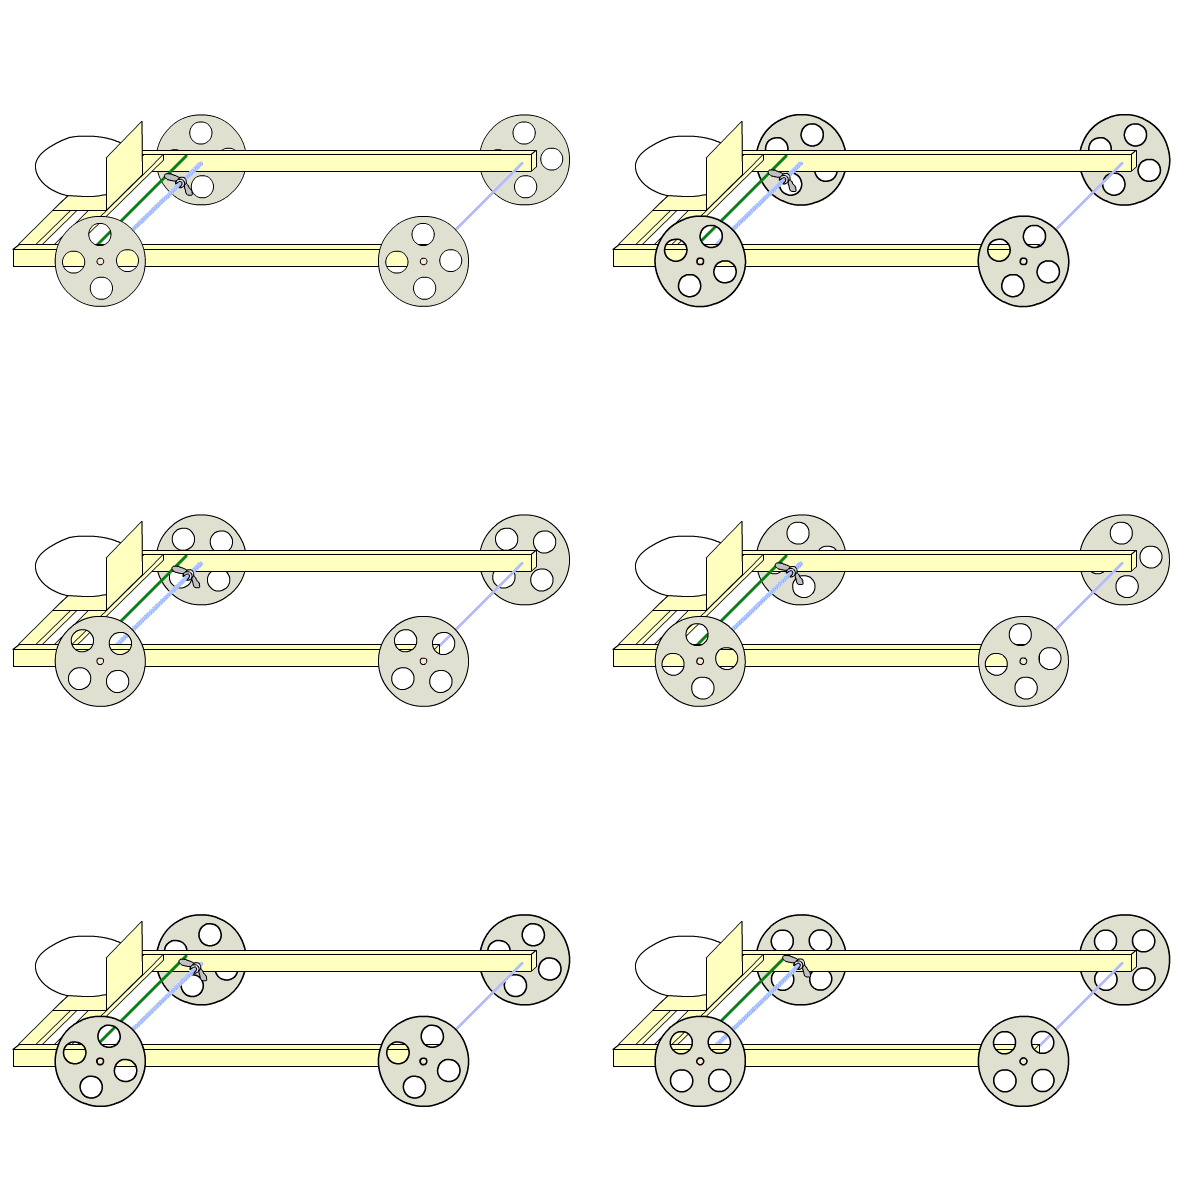
Use a threaded rod for the axle, and place a nut (usually a wing nut is used) on the axle. As the wheels rotate the rotating motion is transferred into horizontal motion of a wing nut moving it along the axle. When the wing nut reaches a barrier, it will no longer be able to move and thus stops the axle from turning. The distance is set by setting how far the wing nut starts from the barrier and is usually measured in rotations of the wheels.
While as described the system is still vulnerable to skid, it can be minimized by carefully choosing a material for the barrier that the wing nut engages during the stopping motion. By choosing something rubbery many teams achieved a gradual locking of the wheels, which effectively eliminated any skid inherent to the system. The wing nut also adds some friction to the axle, thus the ETV may not roll as smoothly or as far.
Brake Pad Type
Brake pads are not allowed in 2017, because the only parts that are allowed to contact the floor are those that are already in contact before the run.
ExpandBrake Pad Type (Illegal for Current Rules)
|
Physics Theory of the brake
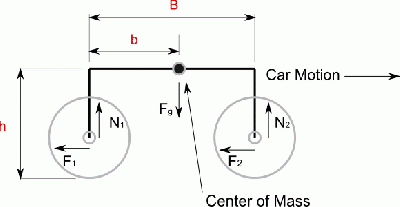
We expand the theory of friction in wheels described in the wheels section. There are four main questions that must be considered during the design of a braking system of an ETV: how long to make the car, where to put the center of mass, which wheels (front versus back) work better for braking and how to avoid skidding. To answer these questions, we shall consider a simple model of a braking eTV.
In the picture, [math]\displaystyle{ N_1, N_2 }[/math] are the normal forces exerted by the floor on the back and front wheels, respectively. [math]\displaystyle{ F_1, F_2 }[/math] are the resulting forces of friction. [math]\displaystyle{ b, B }[/math] are the horizontal distance from the back axle to the center of mass of the ETV and the front axle, respectively. [math]\displaystyle{ h }[/math] is the height of the center of mass, [math]\displaystyle{ m }[/math] is the mass of the ETV. Since the ETV is at equilibrium,
Let [math]\displaystyle{ \mu_1=\frac{F_1}{N_1}, \mu_2=\frac{F_2}{N_2} }[/math]. Because all parts of the ETV must stay in contact and the ETV is not skidding, [math]\displaystyle{ N_1, N_2\ge 0 }[/math] and [math]\displaystyle{ \mu_1, \mu_2\le \mu_s }[/math]. Furthermore, [math]\displaystyle{ 0\le b\le B }[/math], or ETV will flip over.
Solving for [math]\displaystyle{ N_1, N_2 }[/math], [math]\displaystyle{ \begin{cases}N_1 = mg \frac {B - b - h \mu_2} {B + h\left(\mu_1 - \mu_2\right)} \\ N_2 = mg \frac {h \mu_1 + b} {B + h\left(\mu_1 - \mu_2\right)}\end{cases} }[/math]
We now determine which axle is better for braking, if only one is used.
If the front axle is used, [math]\displaystyle{ F_1=0,\ N_2 = mg \frac {b} {B - h \mu_2},\ F_2=N_2\mu_2 }[/math]. Furthermore, [math]\displaystyle{ N_2=mg-N_1\le mg, F_2\le mg\mu_s }[/math]. This is achieved when [math]\displaystyle{ \mu_2=\mu_s }[/math] and [math]\displaystyle{ b = B - h \mu_s }[/math], which is possible if the ETV is long and short. Therefore, [math]\displaystyle{ F_{2,max}=mg\mu_s }[/math]. Notice that if [math]\displaystyle{ b\gt B-h\mu_s }[/math], the ETV would flip over.
If the back axle is used, [math]\displaystyle{ F_2=0,\ N_1 = mg \frac {B - b} {B + h \mu_1},\ F_1=N_1\mu_1 }[/math]. Therefore, [math]\displaystyle{ N_{1,max} = mg \frac {B} {B + h \mu_1}, F_{1,max}=mg\mu_s\frac{B}{B+h\mu_s} }[/math], which occurs when [math]\displaystyle{ b=0 }[/math].
Since [math]\displaystyle{ \frac{B}{B+h\mu_s}\lt 1, F_{1,max}\lt F_{2,max} }[/math]. Therefore, given a choice of using exclusively the front or the back axle, the front axle provides greater maximal friction. However, a front-axle braking system may cause the ETV to flip over, while the back-axle braking system avoids that risk.
If both the back and front axles are used for braking, for example if [math]\displaystyle{ \mu_1=\mu_2 }[/math], then the total normal force is [math]\displaystyle{ mg }[/math] and the maximal friction is [math]\displaystyle{ mg\mu_s }[/math]. Notice that [math]\displaystyle{ F=F_{1,max} }[/math], and the center of mass does not have to be in the front. Therefore, a design using both axles can be very beneficial.
To summarize, the best braking system involves the use of both axles. The next best choice is the front axle only braking system, which requires an ETV to be long and low. The least favorable choice is a back axle only system, but it is stable, like the one using both axles, and may be easier to design. The actual length of the ETV is not important in the stability of the system: the distance from axle to axle is.
It should be noted that having high coefficients of friction (while staying in the rule constraints) on the tire makes all the systems perform much better, and also prevents the ETV from skidding.
Mass Release Mechanism
While optional, the mass release mechanism improves the consistency of the scramblers. Its use negates the necessity of steady hands of the person who is handling the mass and allows for near constant launch speeds. This generally improves the performance of brakes that are strongly dependent on the speed of the ETV, such as the wing-nut braking mechanism. A common design for such a device is a pin system, where the mass is suspended on a pin that can be pulled out to produce a consistent release of the mass.
Rollers
Rollers, also commonly (although dubiously) referred to as pulleys, redirect motion from the string in many designs. Rollers without bearings can cause significant friction, while rollers with bearings have very low friction - buy ones with bearings. Lubricated bearings will decrease the friction even further if the rotation is fast enough. To test if a roller has bearings, take a string and try using the roller to redirect the string while pulling on it. If when varying the tension the resistance also varies, then there is no bearing in that roller.
Bearings
As discussed above, bearings are constant (low) friction devices. They are indispensable in rollers, and often are very helpful to hold axles of wheels (especially for the small wheels). The best bearing for this event would be a radial bearing, with caged balls. It is also preferable to have it be free of the side shields: it is easy for teams to keep them dust free, and by lubricating them regularly the low friction can be maintained very easily.
Energy Propulsion Systems
There are two types of scramblers, based on whether the ETV stays in contact with the mass. In an integrated mass scrambler, the ETV always stay in contact with the mass. The mass may be used to accelerate the car throughout the run, or it is not discarded just to simplify the design. In a launcher system, the ETV is separate from the launcher.
Integrated Mass
These types of vehicles have come into question as to being legal under the 2014 rules.
In an integrated mass scrambler, the mass moves with the ETV: the Energy Propulsion System is likely combined with the scrambler. Because the mass travels with the ETV, the ETV cannot move quickly.
Since all kinetic energy of the ETV comes from the potential energy of the mass,
Furthermore, [math]\displaystyle{ \frac{m_{mass}}{m_{ETV}}\lt 1 }[/math] and [math]\displaystyle{ h\le 1m }[/math]. solving for [math]\displaystyle{ v }[/math], we find
Although [math]\displaystyle{ 4.43m/s }[/math] is fairly fast, the actual speed is much lower because the mass cannot fall for 1 m total, the ETV has mass, and there is energy loss due to friction in the process.
Tower Scrambler
Pros
- Reasonably easy to build
- Good theoretical performance
- Can be almost free to build - see Zero Cost Scrambler
Cons
- Theoretical performance impossible to achieve, so much so that often the required distance cannot be covered
- Manufacture of the variable radius axles can be challenging
- Severe dependence on mass used
The tower launcher consists of an ETV that is propelled by a falling mass that uses a pulley system or otherwise to directly convert the motion of the weight into the motion of the ETV. The energy transfer from potential to kinetic if often efficient. However, the support structure for the mass and the pulley system often increase the masses of the scramblers above 5 kilograms. Therefore, these scramblers are very slow and may not cover the entire distance.
In the 2017 rules, the mass is not allowed to touch the ground. Therefore, a form of nest to stop the mass without damaging the ETV is necessary.
The propulsion system is a compound machine consisting of pulley and and a wheel and axle, where the wheels push on the ground with force [math]\displaystyle{ F=\frac{mgr_1}{r_2}, }[/math] where [math]\displaystyle{ r_1 }[/math] is the radius of the axle and [math]\displaystyle{ r_2 }[/math] is the radius of the wheel. Therefore, the maximum static friction between the wheel and the ground can be achieved by adjusting the radii of the wheel and the axle connecting the wheel. However, a smooth acceleration is often desirable for the design: if [math]\displaystyle{ F }[/math] is very high, the strings may start acting as springs because of the tension. Testing with different radii would be necessary to find the desirable wheel and axle radii.
To improve performance, use variable radius axles. The radius of the axle is larger during launch to accelerate the ETV quickly. Then, the radius of the axle decreases so the mass hits the ground more slowly.
Ramp Scrambler
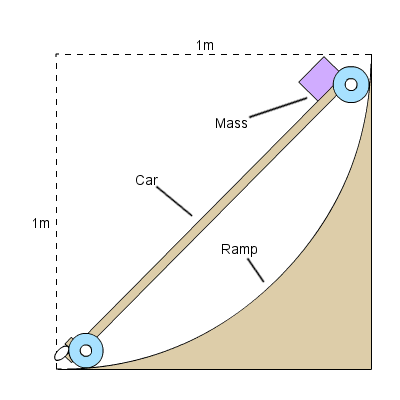
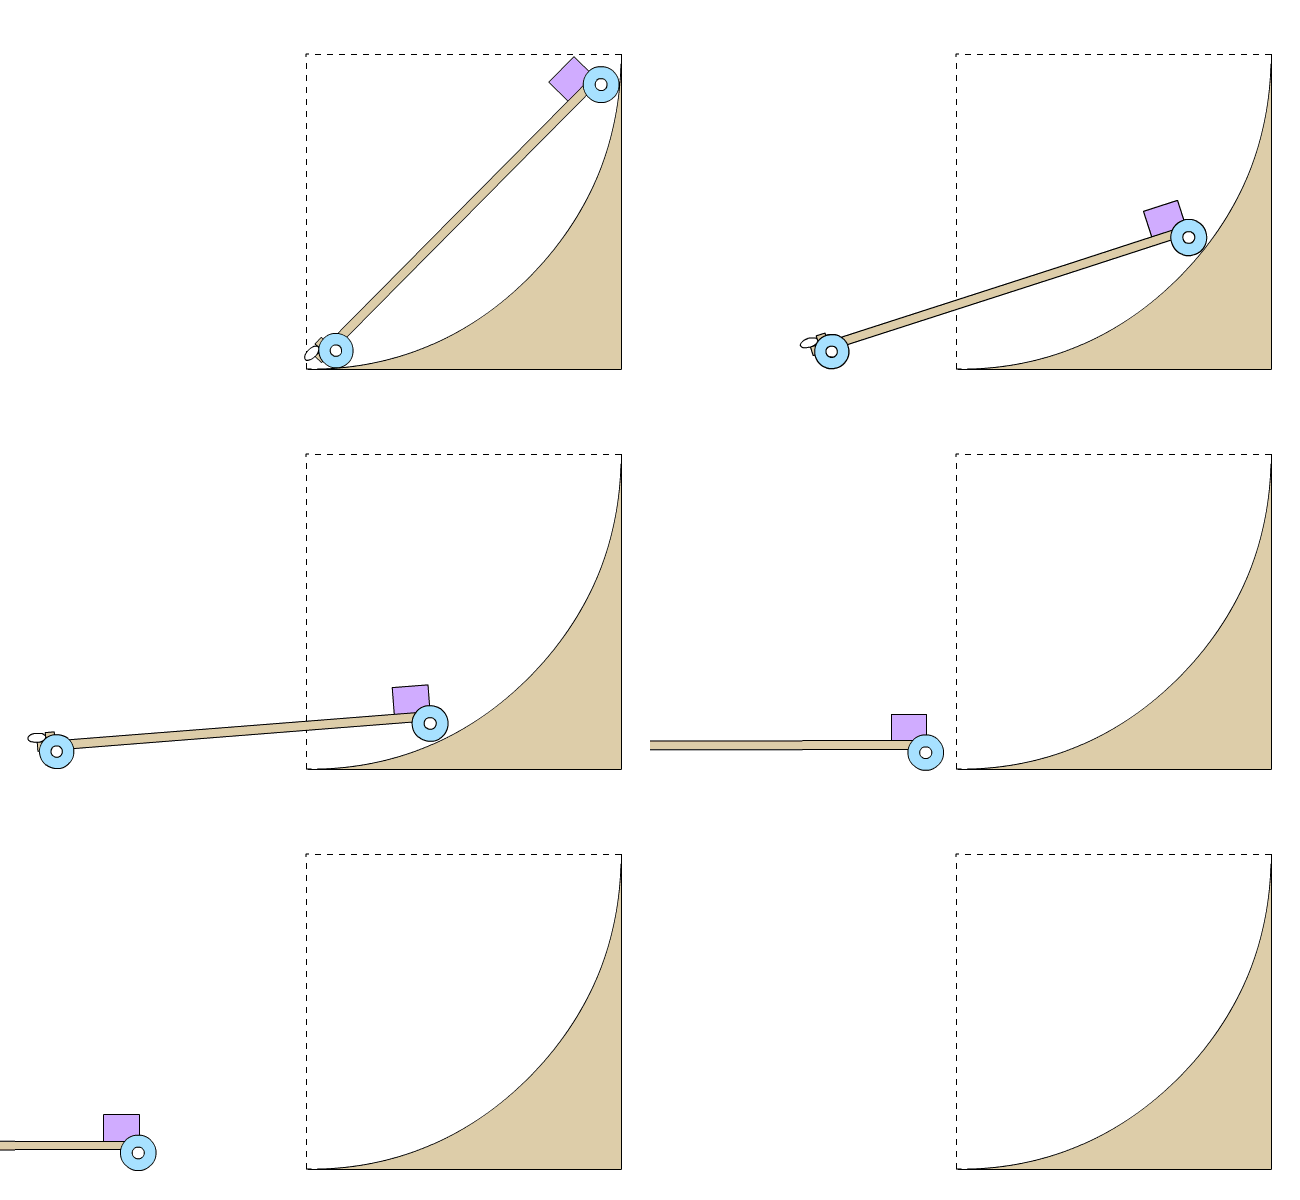
Ram Scramblers are not allowed in 2017: all ETV wheels must be in contact with the floor at all times.
ExpandRamp Scrambler (Illegal under current rules)
|
Launcher
The launcher is the energy propulsion system of the scrambler and does not travel with the ETV. When using a launcher, the mass of the ETV is lower. Therefore, the ETV can travel at a much higher speed.
Spring Launcher
Pros
- Nearly maximum theoretical efficiency possible in a scrambler
- Reasonably easy to achieve the theoretical performance
- Low dependence on mass used
Cons
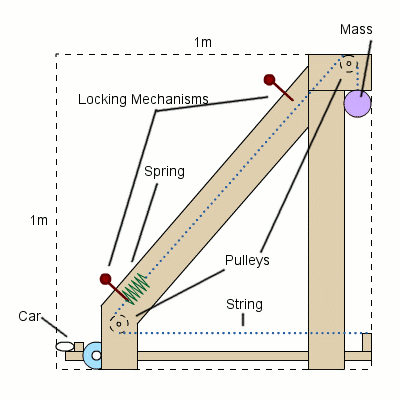
- The locking mechanisms are often difficult to build
- Complexity of the device requires careful construction
- Rapid speed of the ETV makes it difficult to stop
Spring launcher is one of the rarest launcher scrambler types because of it is difficult to build. However, it achieves the highest speeds for ETVs, at all distances and most masses. It is also very similar to a pulley launcher. Therefore, if the setup cannot be built, it can be "downgraded" to a functioning pulley launcher.
The mass first stores its potential energy in some sort of elastic medium, which then is released to accelerate the ETV. There is little loss in energy transfer, as the mass hits the ground with little leftover kinetic energy, and there is little friction.
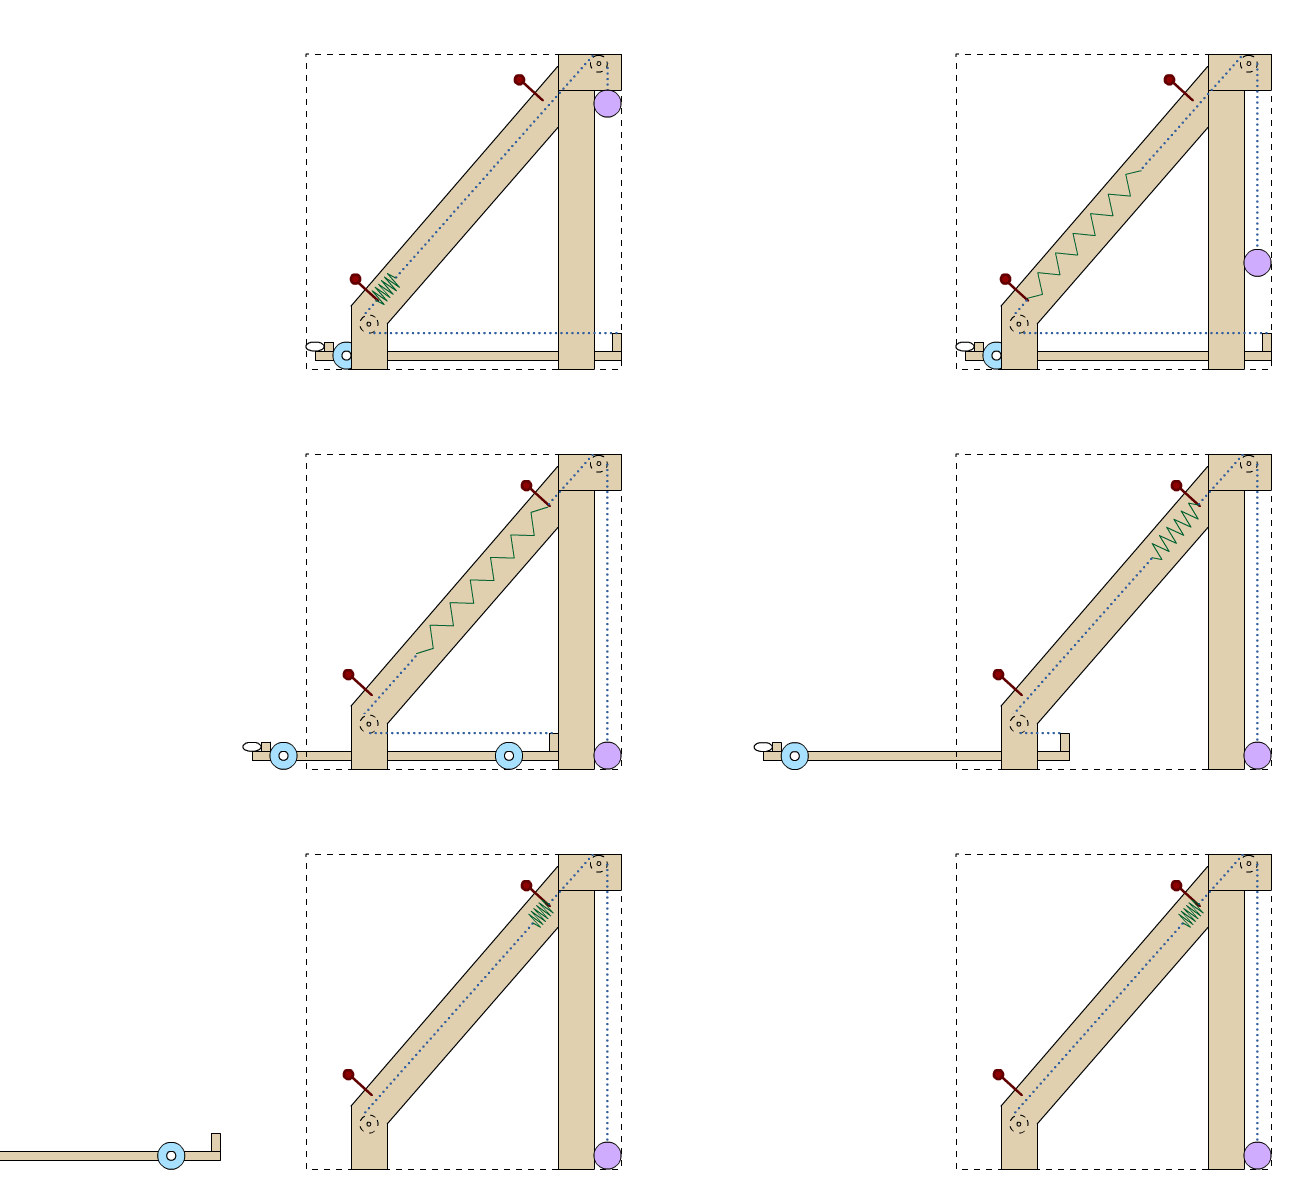
The setup is difficult to build in practice because of the locking mechanism. Masses may be attached to arms with slits in them that allow for a looped string to slip and release the spring once a particular angle is attained by the arm. A system of coupled locks, shown in the diagram above, may be used mediate the energy transfer.
There is a notable time during energy transfer from the mass to the spring. This extra time is compensated the speed obtained. Spring launchers, therefore, perform better at longer track lengths. Because the ETV is launched at such a great speed, that most brakes used for other, slower, launchers are inadequate for this design. Due to the rarity of this design, there is no general solution to this problem yet, but an effective solution is possible in theory.
The following are some numbers derived from physics. Note that this launcher pushes the ETV forward 1 meter before it is set free. Assuming Vehicle Mass of 100 grams. Total Time is from .5m to 8.5m.
| Mass | Exit Speed | Total Time |
|---|---|---|
| 0.5 kg | 9.90 m/s | 0.81 sec |
| 1.0 kg | 14.00 m/s | 0.57 sec |
| 2.0 kg | 19.80 m/s | 0.41 sec |
Look at Jdogg's post for more information on this chart above.
Hammer Launcher
Pros
- High theoretical efficiency
- Very easy to build
Cons
- High dependence on mass used.
- Theoretical efficiency is difficult to achieve, due to the non-elastic collisions
- The rapid acceleration is stressful on the ETV
- There is a chance that the yolk of the egg is ejected from the shell because of the rapid acceleration
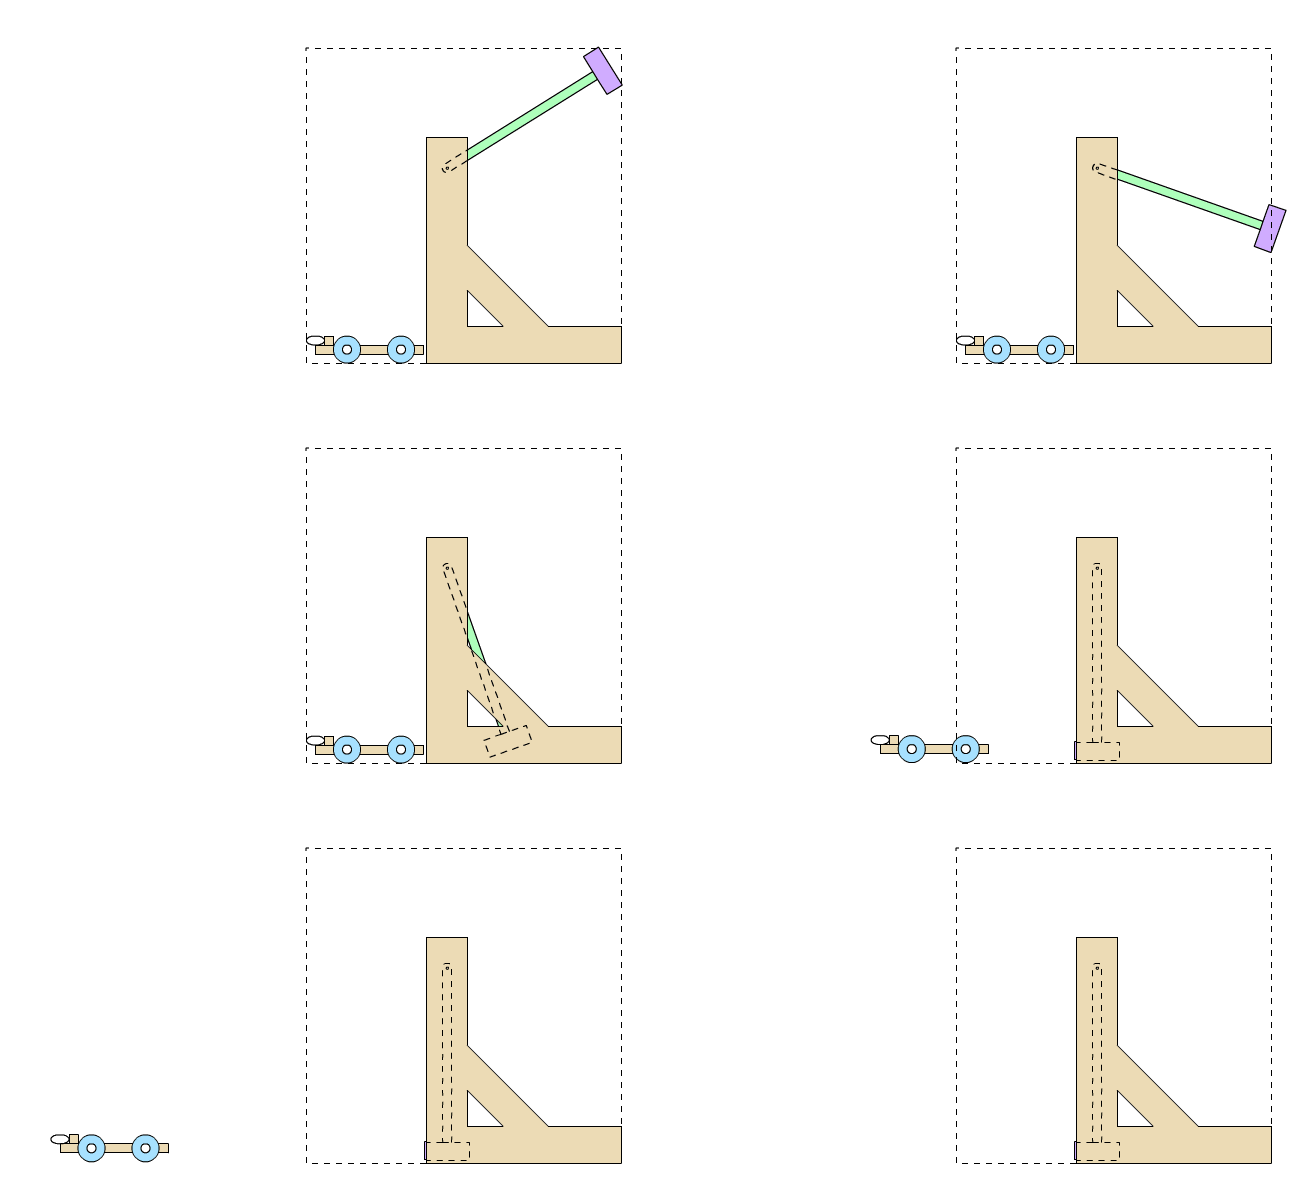
Hammer launcher is one of the easiest launchers you can build. It consists of a pendulum hammer falling and smashing an ETV from the behind.
If the collision is perfectly elastic, [math]\displaystyle{ v_{ETV} = v_{mass}\frac {2m_{mass}} {m_{mass}+ m_{ETV}} }[/math]
Hence, the larger difference between the two masses, the faster the ETV moves: when the mass of the ETV is nonexistent, the ETV moves at double the speed of the mass. Since the mass drops at a maximal final speed of 4.34m/s, the maximum possible speed achievable by an ETV launched by this launcher is 8.84m/s.
It is hard to be near the maximum speed because the collision involved is not perfectly elastic. By varying the materials at the contact position the elasticity of collisions can be enhanced. To keep the ETV moving straight, use longer ETVs and have the hammer hit a specific patch in the middle of the ETV.
The mass of the entire arm must be weighed during the impounding since most designs have the arm lose its potential energy as a whole. To achieve optimum efficiency, most of the mass of the arm must be concentrated at its distal end, thus the hammer/mallet shape of the mass.
Here are some theoretical data:
| Mass | Idle Time | Acceleration Time | Exit Speed | Travel Time | Total Time |
|---|---|---|---|---|---|
| 0.5 kg | 0.59 sec | 0.00 sec | 6.81 m/s | 1.46 sec | 2.06 sec |
| 1.0 kg | 0.59 sec | 0.00 sec | 7.70 m/s | 1.29 sec | 1.89 sec |
| 2.0 kg | 0.59 sec | 0.00 sec | 8.24 m/s | 1.21 sec | 1.81 sec |
Pulley Launcher
Pros
- Good theoretical efficiency.
- Easy to achieve theoretical efficiency.
- Simple construction.
Cons
- Some dependence on mass used.
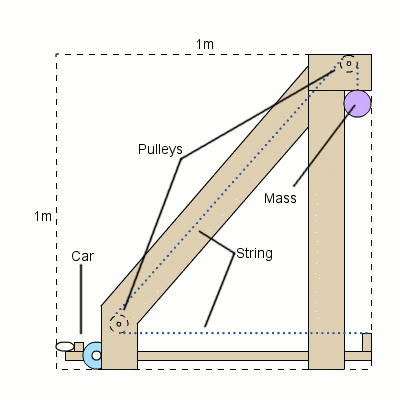
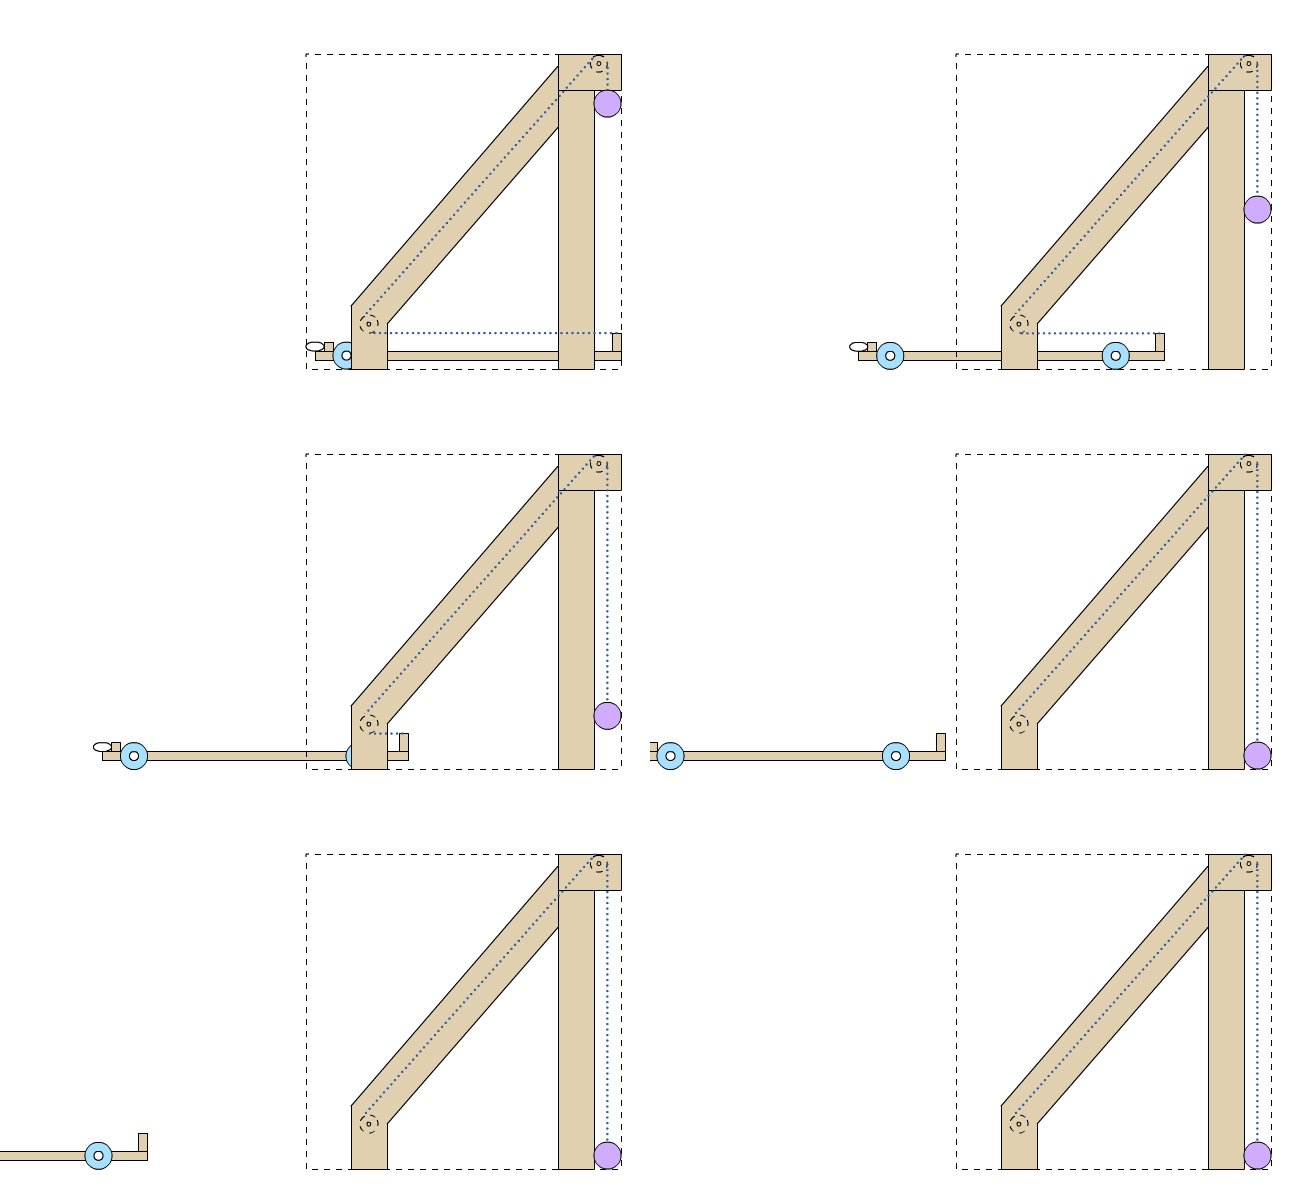
The pulley launcher is one the most common launcher design. It consists of a mass pulling a string that is redirected through a system of pulleys to pull the ETV. This design is efficient and easy to build.
By physics, [math]\displaystyle{ m_{mass} g = (m_{mass}+ m_{ETV}) a }[/math].
By making the mass of the ETV small, an asymptotic acceleration of g is possible. The maximum speed is 4.43m/s.
The fact that this launcher involves no true energy transfers, any deviation from the theoretical performance is explained away by friction in the rollers and wheels. Since those can be easily fixed, these scramblers are often the faster half of launchers in any given competition.
Here are some theoretical data from physics. This launcher pushes the ETV about .7 meter before release.
| Mass | Idle Time | Acceleration Time | Exit Speed | Travel Time | Total Time* |
|---|---|---|---|---|---|
| 0.5 kg | 0.00 sec | 0.51 sec | 3.88 m/s | 2.32 sec | 2.83 sec |
| 1.0 kg | 0.00 sec | 0.48 sec | 4.13 m/s | 2.18 sec | 2.66 sec |
| 2.0 kg | 0.00 sec | 0.47 sec | 4.27 m/s | 2.11 sec | 2.57 sec |
Push Rod Launcher
Push pod launchers are not allowed in 2017, because the only parts that are allowed to contact the floor are those that are already in contact before the run.
ExpandPush Rod Launcher (Illegal under current rules)
|
Competition Tips
Competition Check List
Be sure to bring the following items to competition with you.
- The scrambler car, and all accompanying parts
- Extra mass
- Tools
- Spare parts
- Glue and tape
- A metric tape measurer
Upon arrival to competition, be sure to make a few pre-runs to verify that everything works (do NOT run your scrambler on or near the official track, as it is not only illegal to run it on the track before an official run, but also the ES might not be happy with you running it near the competition area. Find an empty hall with similar flooring and run there.). Also, it is helpful to judge the quality of the surface at the competition location, and use that information during the setting of the brakes.
Common Mistakes and Rule Violations
Most of the teams at the regional and state level get disqualified for out of spec designs. But by reading these guidelines and memorizing the rules, teams can avoid succumbing to the same fate.
- If a scrambler cannot make half the announced distance, the run is counted with a competition violation (1000-point penalty).
- If teams use a mass from a balance set and add a hook to it, it is best for them to check that it is still within rule limitations, as the hook will add mass.
- All scramblers are not allowed to have any stored energy that will add to the propulsion of the device. For example, mousetrap cars are not allowed. The rules, however, allow for stored energy to be used in a braking system.
- When setting up to launch, teams will need to do 4 things in some order: attach the egg to the car, position the car in the launcher, attach the mass, and adjust the braking mechanism for the proper distance. It is highly advised to think ahead of time about what order to do these things in. For example, if a team were to wind the wheels and they were allowed to rotate as the car is rolled into the launcher, the car will end up either long or short.
- Some teams drop the egg and crack it while trying to attach it to the car. This counts as a crack and knocks the team out of the running!
- Work on attaching the egg at ground level, not waist level. Consider bringing a foam pad to sit under the car/egg while you're attaching the egg.
- When setting up, make sure the tape is over the middle of the egg. This is something that many teams neglect to consider. Some stricter event supervisors may even penalize the teams.
- Finally, teams must only trigger their car when the event supervisor has indicated that they may do so. After the run, wait until the event supervisor signals that the car can be retrieved. Chasing the car before being signaled will result in a competition violation.
Shipping and Transportation
Be sure to provide a sturdy crate for your scrambler car if your team has to travel to competitions. A half inch plywood box should be sufficient. Be sure to provide necessary padding so that the scrambler does not get damaged. Also, just in case something does get damaged, make sure to bring enough extra supplies (and tools) to be able to fix most conceivable breakages. This is also useful to prevent other teams from copying your design.
Past Results
Expand2017 National Results
|
Expand2016 National Results
|
Expand2015 National Results
|
Expand2014 National Results
|
ExpandTop 3 2007 National Results
|
ExpandTop 3 2006 National Results
|
ExpandTop 3 2000 National Results
|


