Aia's Boomilever Guide
Small modifications have been made by User:Sciolyperson1 in order to reflect the changes made for the 2019/2020 and 2020/2021 rules with permission from the original author, User:Aia. Changes were not made to her original building techniques and style, in order to keep the original meaning of her directions intact.
This guide is a personal advice page by Aia.
Introduction
The goal of this guide is to help new and intermediate builders contend with the complexities of the boomilever event. I built towers in 2007, boomilevers in 2008, and bridges in 2009, so I hope to offer advice from my own experiences.
DISCLAIMER: The advice I offer here is derived from my own experiences. There are doubtlessly better designs and better building techniques out there. However, I believe my work can be used as a great springboard for learning the event.
Helpful Links
Major parts of the Boomilever
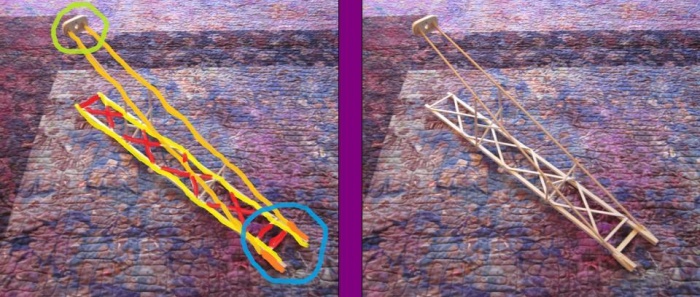
In the above diagram, I have color coded the major parts of a boomilever. Every boomilever I have ever seen built for Science Olympiad has these main parts. Here are the names I have used for them in this guide:
- Yellow: compression members
- Orange: tension members
- Dark orange: distal end connection (the link between compression and tension members)
- Blue: distal end
- Green: base
- Red: compression cross members - also known as bracings (or less commonly, trusses).
Note that I did not color code the members that extend vertically from compression to tension. Very few boomilevers use these members, but I will call them compression-tension connectors when I reference them in this guide.
Compression Members
In my opinion, the boomilever event is won and lost in the compression members. The winning builders are always those who have figured out how to create the best weight-to-mass ratios in their compression. Since they are usually the heaviest part of any boomilever, this isn't surprising.
There are hundreds of different ways to engineer your compression members. I ultimately opted for a "single stick" compression approach and then found the ideal density for those sticks. In retrospect, I would not use this approach again. I found that any issue with the balsa used for the compression (for example, non-parallel grain, non-uniform density, etc.) would lead to very early failure. It was sometimes impossible to identity faulty pieces of balsa beforehand.
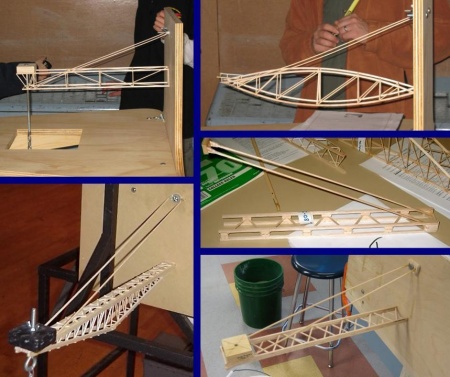
Many of the most successful boomilevers I saw during the 2008 season used a much more complex approach. In the above image, I have shown a number of different types of compression members. Given what I know now, I would suggest experimenting with many different types of compression at the beginning of the season. Hopefully you can then identify a promising design and continue to perfect it from there. I also strongly recommend looking at high-scoring elevated bridges from 2009 and 2010 in the gallery. These bridges utilize much of the same engineering that boomilevers will require in the compression.
In the 2018-2019 season, two of the most commonly used designs were the designs shown in the above photo's top left and bottom right - commonly called "tower chimney" and "two column" styled boomilevers, respectively. Both designs proved to yield similar results, with tower chimney style boomilevers performing on average slightly better.
In the 2019-2020 and 2020-2021 seasons, a rule change was added so that the contact width of the boomilever must be at least 8 cm wide at the wall (see SOINC's Boomilever Diagram. Because of this, modifications to boomilevers have been made.
- The most common method of meeting the 8 cm contact width rule is to form a trapezoid-like shape with the compression beams, so that they are 8 cm at the wall, but are around 5 cm at the end, to support the loading block.
- Another method of meeting the 8 cm contact width rule is to have parallel compression beams. Since at the end of the boomilever, the loading block cannot be supported (as the loading block is 5 cm wide, and the boomilever is 8 cm), you can use a piece of balsa to bridge across that gap, so that the boomilever is supported there.
- A third method of meeting the 8 cm contact width rule is to have a tower design, similar to the tower shown here:
In the first half of the boomilever, the tower shrinks down from 8cm to 5cm, and for the second half, the compression members are parallel, staying at 5 cm apart.
Alternatives of the above methods of compression members are possible. In the competitive scene, teams occasionally have boomilevers that are less than 5 cm apart, usually around 2.5-3.5 cm. Although harder to build and test, it has advantages which include better tension member strength and usually slightly higher scores.
Tension Members
In my boomilevers, I eventually chose to use 3/32" square bass tension members. I tried using balsa tension members, but they routinely broke early in the loading process. My tension members were forced to "curve in" because I wanted to minimize the size of my base. I think that this added curve made the balsa tension members much more prone to shearing apart. I also tried using smaller bass pieces for the tension members, but I still seemed to have the best success with the 3/32" square.
I also found that the lightest bass pieces, as long as they were 3/32" square, could withstand the full load plus some. When purchasing wood, I suggest bringing a scale and only buying the lightest bass sticks. Although bass doesn't vary in mass nearly as much as balsa does, I could still find pieces that were significantly lighter (.4-.5g) than some of the others. A good rule of thumb is to save your best/lightest bass members for competition structures.
Other common sizes include using 1/8" square balsa tension members to reduce weight - although balsa wood grain tends to vary more than bass wood grain. Another option would be to use 1/32 x 1/8~1/4, which has approximately the same cross section area, but is thinner from one side.
Distal End
The distal end of a boomilever (where compression members attach to tension) is another critical area that needs strong reinforcement. If failure occurs at this connection point without any failure in compression, the boomilever has not reached its highest potential score.
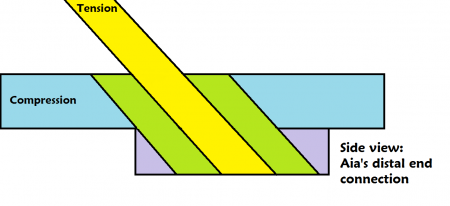
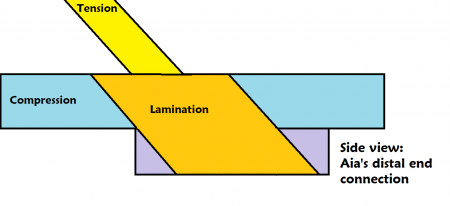
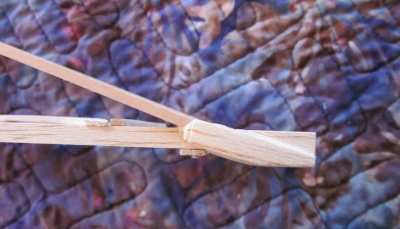
In a nutshell, I contended with the distal end by artificially increasing glue surface area, adding a lamination, and using gorilla glue and clamps. Although many pictures of my distal end design can be seen here, I have created a few color-coded diagrams to show the hidden engineering behind them.
This first diagram shows a side view of the distal end. I began by using purple CA glue to add the small purple stick alongside the bottom of the compression members in the same vertical plane. This purple stick was usually never longer than three centimeters. As you can see, it needed to be long enough to later accommodate a tension member and two green pieces that will be placed on either side.
I then used the same purple CA glue to connect the compression and tension members as a lap joint. Note that the tension member also extends over the purple piece. The added surface area for the tension member is key to strengthening the joint.
My next step was to add the green members on either side of the tension. Note that these green sticks also extend over the purple piece of balsa. I typically used balsa that was the same size as the bass compression members for this step. However, instead of using purple CA glue here, I opted for gorilla glue.
In the final step, I used a wide balsa stick to laminate over the green members and the tension member. I also used gorilla glue in this lamination and clamped the result for 24 hours. After these steps, the distal end connection basically becomes a sandwiched tension member. The reinforcement may be overkill, but I never had failures at this joint after adopting this approach.
As a side note, I did typically sand this joint after the gorilla glue dried to remove excess wood and glue. However, there were a few areas around the joint I did not sand for fear of accidentally nicking the tension members and creating unnecessary weakness. The image below shows the finished result.
Compression Cross Members
Compression cross members (as seen here) are all of the members used to connect the compression members. These members are typically very tiny and light. There are two main sizes of balsa that I have seen used for these members:
- 1/16" square: I discovered that I could easily buy 36" sticks of this size that weighed only .3g per stick at my local hobby store. There are two slight disadvantages of this size when compared to the 1/8" by 1/16" option. First, this size provides less surface area for the glue surface. Second, this size does not work well for making "X"s with itself.
- 1/8" x 1/16": I could only find this size in weights as low as .5g per 36" stick when I went to hobby stores. Obviously, it is much heavier than the 1/16" square option. However, the advantages of this size included increased glue surface area and easy "X" construction.
From what I've seen, most builders have a strong preference for one of the two sizes. I would suggest experimenting with both to determine which works best for you.
Base
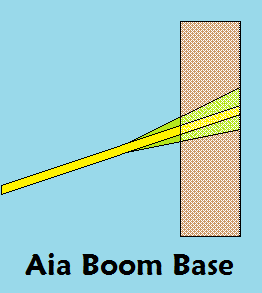
ExpandAia's 2008 Base Design
|
Starting from the 2014 season, rules required you took hook your boomilever onto a J-hook (model N232-892), rather than to bolt your boomilever onto the testing apparatus, which can be seen here.
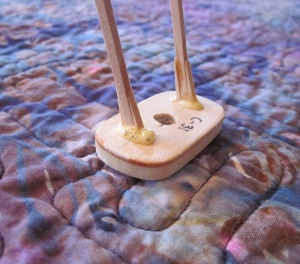
- A common method for builders new to the event would be to use a 1/4" circular dowel and glue it in between the tension members. Although it may be strong, dowels often weigh a disproportionate amount compared to the rest of the boomilever.
- Another method which is used is to use a piece of balsa wood (1/4" square), and sand it into a trapezoid shape, then to sand a divot into the trapezoid and gusset the connection with a small balsa wood sheet, seen here.
No matter what design is used, the larger the surface area of the base, the better (as the force is spread to a larger area). However, it is important that the base material is rigid and does not bend, or else the base will split.
A divided issue among the boomilever community is how long the base should be - some designs have bases that are 5cm - 8cm long (the width of the boomilever, allowing the tension members to be completely perpendicular to the testing apparatus), and others which bend the tension members inwards, allowing the base to be merely as wide as the hook itself (1/4"). The latter often performs better than the former, due to the lesser weight of the base. Moreover, when a force is applied to a side of a stick - in this case, the base - a shorter member buckles less easily than the longer member.
Building Techniques
In this section of the guide, I have included the most common building topics I see discussed on the forum. If I have missed any major topics, feel free to send me a message and I will add a new section.
Balsa vs. Bass
I have seen the “bass vs. balsa” question asked countless times on the forum. In my opinion, neither one is inherently better than the other. I’ve seen nationally medaling structures that were all balsa AND nationally medaling structures that were all bass. However, based on availability alone, I do believe balsa is a better option than bass for most builders.
Here are the advantages and disadvantages of each type of wood:
- Balsa's advantages
- Lighter
- Commercially available in many sizes
- Much easier to sand, cut, and glue
- Balsa's disadvantages
- Lots of variation in density through one stick
- Non-parallel grain
- Bass's advantages
- More uniform density
- Bass's disadvantages
- Heavier
- Available in fewer sizes and sold in fewer locations
- Typically sold as 24” sticks instead of the 36” sticks that balsa is sold as
For the boomilever event, I used both balsa and bass. I typically used bass tension members and a small amount of bass in the lamination of my base. I used balsa everywhere else.
Balsa’s density variation is both an advantage and a disadvantage to a builder. For example, I quickly found that 1/16” x 1/16” sticks that were 36” long could weigh anywhere from .3g to >1g. Using the .3g sticks for my cross members immediately lightened my structure without compensating any strength. Although variable density can prove advantageous to the builder, it also carries the danger of being non-uniform. Let me illustrate this issue with an experience from my tower years:
- During the 2007 tower season, I generally chose my four legs by picking two 36” sticks of an equal weight and cutting them down to size. For argument's sake, let’s say each 36” stick was initially 1.5g. After cutting the balsa down, I then found that my four legs could weigh considerably different amounts (e.g. .7g, .7g, .9g, and .5g). Obviously, the .5g leg will be the first to fail and this is not ideal.
To contend with the variability of balsa, I suggest recording the weight of each piece (not each stick) of balsa you use in your final structure. For example, record the weight of each tension member in your boomilever, the mass of each component of the base, etc. This will help you maintain tension members, compression members, etc. of a similar density from boomilever to boomilever. These values also provide an easy way to quantify the distribution of weight in your structure and allow easy replication later.
Balsa Grain
If you purchase balsa on your own, I also suggest looking at balsa grain as a means of balsa quality control. In my experience, I’ve found that balsa has three different types of grain:
- A grain: This grain is well-defined and has long fibers running down the length of the wood.
- B grain: This grain displays properties of both A grain and C grain.
- C grain: This grain has a mottled, blurry appearance.
Some balsa sticks have several types of grain, depending on which face you are looking at. As a general rule of thumb, the grain should ALWAYS run parallel to the edge of the wood, especially in balsa that will be used in compression members. Balsa tends to shear along grain lines, and I found this especially true for boomilever compression members. Looking at balsa sticks before purchase also allows you to note any major defects, such as crookedness or splintering.
As you build more and more structures, you will come to learn that each type of grain has advantages and disadvantages. I generally found that C grain worked best for compression.
If you choose to use balsa for the tension members of the boomilever, A grain would be the optimal grain.
Tools
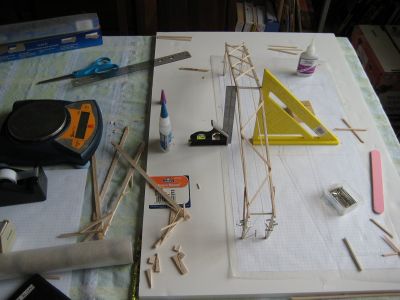
The image below shows my building area while constructing a bridge. I would suggest obtaining many of the items you see here.
- Building surface: I used 1/2" thick foam core as a building surface. I taped down my design and wax paper onto the foam core. Foam core is available at almost any major craft store. A word of advice: do not buy any foam core that is less than 1/2" thick. It will warp over time.
- Pins: I believe the pins shown here are called "T-pins"; they too are available at major craft stores. After completing a sketch, pins help anchor wood into place as you are gluing it. Pin the wood tightly, but be careful not to crush the balsa in the process. I found that the slightly longer pins were easier to work with.
- Sandpaper: I suggest buying medium and fine sandpaper at the very beginning of your SO season. You'll use it frequently.
- Sanding sticks: I was able to buy sanding sticks of different grits at my local hobby store. Emery boards also work for sanding wood. If you cannot find sanding sticks commercially, you can easily build your own. Simply glue the appropriately sized piece of sandpaper onto a piece of balsa. I sometimes preferred these sanding sticks because I could make them the exact width that I wanted.
- Scale: If possible, I would suggest using a .01g electronic scale. I was able to rent mine from a science teacher at my high school to use for the duration of the season.
- Level: A level is one of the most important tools the balsa events. I owned two, which was quite convenient. I usually left one in my building area and the other in the toolkit that I took with me to competitions. Most proctors in 2008 allowed me to impound a level with my boomilever. This was a huge advantage because I could use the level to situate the boomilever perfectly before loading.
- T-square: I primarily used my T-squares in 2009 when I was connecting bridge trusses. However, there were a few occasions during the boomilever season that I really needed one. The plastic T-squares are pretty cheap, so I would suggest investing in one.
- Glue: I would purchase purple CA, blue CA, and gorilla glue for the boomilever season. See the glue section below for more details.
- X-Acto #2 Knife: This is the blade I used to cut all the balsa and bass I needed for the season. I bought the exact product seen here. The cap is a nice addition that isn't sold with all knives; I would suggest buying a package that includes one. As my blades wore out, I bought replacements as needed. These knives and blades can be found at all major hobby and craft stores.
Other tools that I used included graph paper, wax paper, calculator, yardstick, fine point pen, and ruler.
Glue
I used the following glues while building my boomilevers.
- Purple CA glue: I used purple CA (cyanoacrylate, 5-15 sec) glue on 90% of the joints of my boomilevers. It's somewhat viscous, so it is easy to apply. This glue works best on lap joints.
- Application: When I first started building, I used to put a small dab of glue (about the size of a penny) on wax paper and use a toothpick to apply glue to the appropriate location. In time, I eventually switched to squeezing glue directly from the bottle onto the wood. With practice, you can carefully get the exact amount of glue that you want with no excess.
- Availability: I could only find this glue at hobby stores. At one point, I did try buying Krazy Glue (another CA glue) at a large craft store, but it was never as effective as what I found at the hobby stores.
- Helpful hint: I found that the 1 oz bottles (instead of 2 oz or larger) were the easiest to use. Firstly, the bottles were easier to squeeze without using too much glue. Secondly, I did discover that glue could dry out in the bottle over time and become hard and thick. By choosing 1 oz bottles, I could usually use all the glue before it hardened.
- Blue CA glue: I used blue CA (cyanoacrylate, 1-2 sec) glue on butt joints. It's very watery and difficult to apply. In general however, it tends to give stronger joints than the purple CA glue because it soaks into the wood. In my experience, it dries almost immediately after application.
- Application: I always applied blue CA directly out of the bottle. Because it's watery, it comes out of the bottle very quickly. I would suggest practicing application prior to gluing anything onto your structure.
- Availability: Like purple CA, this glue is found at hobby stores. I could find no equivalent at major craft stores.
- Helpful hint: Blue CA gets very hot as it dries, so try not to get it on your hands.
- Gorilla Glue: I only used gorilla glue while building boomilevers. Even then, I only used it in a few select locations on my structure (primarily the base). Gorilla glue expands as it dries, ultimately growing to 4-5x its original size. Unlike CA glue, gorilla requires clamps after application and a 24hr drying period.
- Application: I never squeezed gorilla glue onto any structure directly. After creating a dab on wax paper, I always applied it using a toothpick. Until you become familar with gorilla glue, always apply LESS than you think you'll need. The glue expands a TON.
- Availability: Gorilla glue is available nearly anywhere- craft stores, hobby stores, hardware stores, office supply stores, and even some grocery chains carry it.
- Helpful hint: Avoid plastic clamps if possible. I used rubber tipped clamps (seen here) that didn't indent the balsa.
Frequently Asked Questions
- When I begin building boomilevers, should I build heavy or light structures first?
- I would suggest building heavy structures (~35g) at first. If you attempt to "overbuild" a structure but discover that it only holds 8kg, you'll have an easier time locating your weak points and improving from there. Once you have a structure that can hold the full weight or more, you can then start whittling mass off the structure by trying lighter renditions of the same design. It may be the case that your design doesn't have much excess mass. At this point, I then suggest overbuilding a different design and repeating the process.
- When I start building my boomilever, which parts do I put together first?
- I normally began by gluing my compression members together and adding the associated cross members. The resulting structure (depending on your design) looked like a box beam or a ladder. I then tipped this “ladder” on its side to add the tension members and reinforce the distal end. Finally, I tipped my boomilever “up” like a tower to add the base. I used this orientation because it allowed me to ensure that the base and compression members were flush against a flat surface.
- Why did you use compression-tension connectors on your boomilever you used for Nationals?
- There were several reasons why I used compression-tension connectors on my nationals boomilever. First, these members helped simplify building process and helped situate my structure when testing at competitions. Imagine a boomilever that does NOT have these members. The overall structure becomes more flexible and flimsy, which can make perfect alignment on a testing wall difficult to achieve. The second reason I used these members relates to engineering. As you can imagine, boomilever compression members are prone to flexing in the vertical plane. Thus, compression-tension connectors can prevent this flexing and early failure. In retrospect, I tend to think of these members as unnecessary “training wheels”. Although they can simplify the building and testing process, they are not necessary if you build carefully.
- What do you think of CA accelerant?
- I am not a fan of accelerant- I don’t think it’s necessary in the balsa building events. Even the thick purple CA glue dries very quickly (~5 sec). When experimenting with accelerant in the past, I’ve found that it’s difficult to control the application. The accelerant I bought was watery and was applied through a spray nozzle. As a result, I routinely ended up using much more than I originally meant to, adding extra mass to the structure.
- When I first began building with balsa, I often used three or four times as much CA as I needed. In this case, I did find that the glue dried slowly. So, if you find that your CA glue is not drying well, I would double-check the volume that you’re using. Also, old CA doesn’t always work well. At this point, I would buy a new bottle of glue and skip the accelerant.
- Besides the boomilever itself, what should I bring to the competition?
- Beyond the boomilever, the most important things you can bring to the competition are goggles and the event rules. I would suggest keeping a loose copy of the rules on your person and taping another copy to the box used to transport your boomilever. Although judges will do their best to run the event, mistakes will sometimes be made and the rules are your best recourse for soliciting changes. In my experience, judges are more than happy to make changes if they see the changes are consistent with the rules.
- I would also suggest putting together a small toolkit to take to competition. I always included a little bit of wood, glue, exacto-blade, sandpaper, and a level. These items can help fix a boomilever if any issues arise during transport. Upon impounding a boomilever, I also asked judges if I could impound a level. I competed at five competitions for boomilever during 2008, and in ALL of those competitions, judges allowed me to impound and use a level during testing. Having a level available can give you a significant advantage in balancing your boomilever, especially if your base only accommodates one bolt. The trick is to ask politely and to ask before any boomilevers are tested.
- How does humidity affect a boomilever?
- If you are building and testing in the same area (humid or dry), then you are already taking atmospheric conditions into account during testing. Humidity will only make a difference if you build in one area and test in another. You might encounter this situation if you build at home and then travel far to a competition (e.g., Nationals). If you are building in dry climate and testing in a humid one, I would suggest packing as many silica packets as possible in the transport box for the boomilever. During the 2009 Nationals in Georgia, my bridge gained .3g in water mass from humidity. A friend of mine used silica packets, and his bridge only gained .1g of mass.
- How are your compression-tension connectors attached to your structure?
- These members form lap joints over both the compression and tension members. Because my tension members are angled in, the lap joints are possible.
- How does the loading block sit on your structure?
- The loading block sits on the compression members and between the tension members. I usually built my compression members to be 5.1-5.2cm wide from outside edge to outside edge. As you increase the distance between compression members, you increase the risk of the loading block falling through the structure. You also add unnecessary twisting forces to the compression. To illustrate this, imagine a loading block that barely sits on the compression members. As more sand is added, the compression members will rotate out (or "flare out", as I like to think of it). This effect is magnified further by the way that the tension members are attached to the compression.
- To combat this issue, I generally built to the smallest margin that could still reliably accommodate the loading block. I also then added a small horizontal 1/8" x 1/16" piece on the underside of my compression members to prevent the rotation of the compression. If you are beginning builder, it may take time before you can build to this level of precision, so I would suggest using more of these small horizontal pieces under the loading block area. Do remember to leave room for the bolt!
My Top Ten Tips for the Boomilever Event
- Keep a very detailed log of all pertinent information to each boomilever, including the mass of each individual member used in the structure.
- Take photos of your boomilevers before and after testing.
- If possible, film the boomilevers you test.
- Look at photos of past boomilevers, bridges, and towers to gain new ideas.
- Don't be afraid to try a new design if your current one isn't working.
- Check your wood grain.
- Sand carefully and conservatively.
- Glue carefully and conservatively.
- Try to be as exact as possible during your building process- inexact measurements can snowball into bigger issues.
- Be prepared to build and test, build and test, build and test...


