Forensics
| Forensics | ||||||||||||||||
|---|---|---|---|---|---|---|---|---|---|---|---|---|---|---|---|---|
| Type | Chemistry | |||||||||||||||
| Category | Lab | |||||||||||||||
| Description | Given a scenario and some possible suspects, students will perform a series of tests. These tests, along with other evidence or test results, will be used to solve a crime. | |||||||||||||||
| Event Information | ||||||||||||||||
| Approx. Time | 50 minutes | |||||||||||||||
| Impound | No | |||||||||||||||
| Allowed Resources |
| |||||||||||||||
| Rotates | No | |||||||||||||||
| Eye Protection | C | |||||||||||||||
| Latest Appearance | 2023 | |||||||||||||||
| Forum Threads | ||||||||||||||||
| ||||||||||||||||
| Question Marathon Threads | ||||||||||||||||
| ||||||||||||||||
| Official Resources | ||||||||||||||||
| Website | www | |||||||||||||||
| Division C Results | ||||||||||||||||
| ||||||||||||||||
Forensics is a permanent Division C chemistry event involving the use of concepts in chemistry to solve a fictional crime scene. Participants will be given a scenario and possible suspects, as well as physical evidence from the categories outlined in the rules manual. They will be able to perform tests on the evidence and use the results to solve the crime. Participants may bring two 8.5x11" pages containing information on both sides in any form from any source, as well as a kit of lab equipment to perform tests during the event.
This event is closely associated with the Division B event Crime Busters.
Supplies and Safety
To participate in Forensics, every team of students should come prepared with the proper safety equipment. This includes:
- Category C eye protection
- An apron or lab coat
- Close-toed shoes
- Clothes that cover the skin down to the wrists and ankles (no loose-fitting pants)
Students with shoulder-length or longer hair should also tie it back. Gloves are not required by the rules manual, but may be required by the event host. Always check the website for your specific tournament to see if they have any safety requirements not covered by the rules manual. Students not following the proper safety requirements or behaving unsafely during the event may be penalized or disqualified.
Practicing at School
To practice for the event at school, students should check with a coach to ensure that they have access to all of the potential pieces of evidence that may be tested. This includes:
- Powders: sodium acetate, sodium chloride, sodium hydrogen carbonate, sodium carbonate, lithium chloride, potassium chloride, calcium nitrate, calcium sulfate, calcium carbonate, cornstarch, glucose, sucrose, magnesium sulfate, boric acid, and ammonium chloride
- Hairs: human, bat, cow, squirrel, and horse
- Fibers: cotton, wool, silk, linen, nylon, spandex, polyester
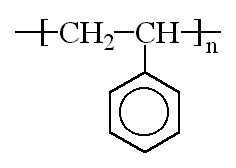
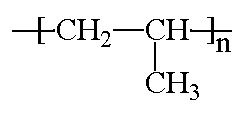
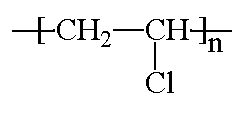
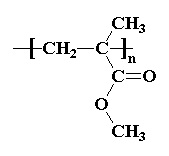
- Plastics: PETE, HDPE, non-expanded PS, LDPE, PP, PVC, PMMA, PC
Powders are often the easiest to find, since many of them are common household substances. When sourcing fibers and plastics, competitors should check any tags or labels on the items to ensure that they are the correct substance. Powders can be stored in old pill bottles, test tubes with lids, or even simple plastic bags. Be sure to label them properly so as to not confuse the powders. Coaches should also source iodine (KI solution), 2M hydrochloric acid, 2M sodium hydroxide, Benedict's solution, a Bunsen burner, and a wash bottle. For more information on the materials required to perform chromatography, see the chromatography section of this article.
At the Competition
Competitors are responsible for providing their own lab equipment to perform the event. The full list of allowed materials for all Division C chemistry events is available on soinc.org, but a list is also provided below. Any students that do not provide their own equipment will not be provided equipment, so it is best to bring as much as is allowed. However, students bringing non-permitted equipment than is allowed may be penalized up to 10% by the event supervisor.
- 50, 100, 250, and 400 mL beakers
- Test tubes
- Test tube rack
- Test tube brush
- Test tube holder (for heating test tubes)
- Petri dishes
- Spot plate
- Microscope slides
- Cover slips
- Droppers/pipettes
- A spatula/spoon/scoopula
- Stirring rods
- Metal forceps/tweezers
- Thermometer
- pH or litmus paper
- Hand lens
- Flame loop
- Cobalt blue glass
- Conductivity tester
- Paper towels
- Pencil
- Ruler
- Magnets
Qualitative Analysis
Qualitative Analysis is the section of the test that involves the identification of unknown powders. The number of powders given can be within the given ranges based upon the level of competition. 3-8 powders will be given at the regional level, 6-10 samples will be given at the state level, and 10-14 powders will be given at the national level competition.
It is helpful to include a flowchart to aid with powder identification on your note sheet.
There are fifteen different substances that may be given in a test. These are sodium acetate, sodium chloride, sodium hydrogen carbonate (sodium bicarbonate), sodium carbonate, lithium chloride, potassium chloride, calcium nitrate, calcium sulfate, calcium carbonate, cornstarch, glucose, sucrose, magnesium sulfate, boric acid, and ammonium chloride. Utilizing all available means of identification will give the best results and help draw a more accurate conclusion.
Methods of Identification
Flame test
The flame test uses a Bunsen burner and a nichrome wire. If nichrome wire is not available, wooden splints (such as coffee stirrers) soaked in water work and dry samples of the powder on the tip of a spatula or scoopula work well too. To perform this test, dip a clean nichrome wire in distilled water, and then dip the loop of the wire into a small sample of the dry chemical. Hold the loop of the wire in the cone of the flame and observe the color of the burning chemical. If desired, a piece of cobalt blue glass may be used for viewing. Chemical cations determine the color of the flame, and their characteristics may indicate the chemical identity.
- Sodium: golden yellow flame, very distinct. Even a small amount of sodium will contaminate other compounds.
- Lithium: carmine or red flame
- Calcium: yellow-red flame
- Boric Acid: bright green flame, very visible
- Ammonium Chloride: faint green flame
- Potassium: light purple, lavender flame
Note that sodium can easily contaminate some substances, and its presence can mask the other cation colors, giving off a yellow flame. The purpose of the cobalt blue glass is to block off the yellow color given by sodium in case the sample may have been contaminated. In some cases, this yellow color can appear a little golden or orangish, rather than a lemon-like tint of yellow. Some powders have been said to not give off a flame color, including, but not limited to, calcium sulfate and calcium carbonate, which will be evident. Cleaning nichrome wires should help, though that is not guaranteed. To do this, stick the wire into the flame until no color is observed (or until the wire glows orange, whichever happens first). Next, dip the wire into acid (hydrochloric acid should do the trick, as it should be readily available during the competition for obvious reasons). Finally, dip it into deionized water, and then it's ready for use again. This problem can perhaps also be solved by just bringing an abundance of utensils to decrease the chances of needing to clean any, but this method of cleaning nichrome wires should help in the case having more tools is not a viable option.
There are additional properties of some of the powders that can also be observed in a flame test. For example, heating a carbohydrate such as glucose or sucrose will cause it to melt and caramelize. Heating dry ammonium chloride for a few seconds will cause it to release white wisps of smoke. These are best observed with the method of putting dry powder on the tip of a spatula or a scoopula and holding it directly in the flame.
Tests with liquid reagents
Liquids used for identification are iodine, sodium hydroxide, hydrochloric acid, Benedict's solution, and water. Not all liquids are applicable to all samples.
- Iodine: When iodine is added to cornstarch, the sample will turn black. If cornstarch is not present, the iodine will remain brown.
- Sodium Hydroxide: Sodium hydroxide is used simply to categorize your samples into two fields: NaOH reactive- and non-reactive. For this reason, it is extremely useful when using a flowchart. To perform this test, a few drops of NaOH are added to a small sample of chemical dissolved in water. If a milky-white precipitate forms, the sample is NaOH reactive. If a precipitate does not form, the sample is NaOH non-reactive.
- Hydrochloric Acid: Hydrochloric acid will react when added to samples containing carbonates--therefore, it is useful in identifying calcium carbonate, sodium carbonate, and sodium hydrogen carbonate.
- Benedict's solution: Benedict's solution is used to detect reducing sugars such as glucose. To perform this test, dissolve a small sample of chemical in water in a test tube. Add two to three drops of Benedict's solution, then place the test tube in a hot water bath. If the glucose is present, the sample will react and form an orange precipitate. This test may take a few minutes; be patient. An important fact to note is that sucrose will not react with Benedict's solution but glucose will. Benedict's solution can also be used to test for ammonium chloride. Adding a couple of drops will turn the sample a dark blue.
- Water: Water is used for determining the solubility of chemical samples, and is used for making solutions.
pH
The pH data for chemicals can be useful, especially for determining between two similar chemicals. Most samples have a pH of between 5 and 8, but there are several chemicals that have distinct pHs. For example, sodium carbonate has a pH of 10, and boric acid has a pH of 4.
There are many different kinds of pH paper, sometimes also called litmus paper, that can be used to perform this test. Any kind should do. The test involves dissolving some of the dry powder in water, dipping the end of the pH paper in the solution, and comparing the resulting color to the palette on the package to see which pH value corresponds to it.
Conductivity
Certain chemical samples will dissociate and become conductive when dissolved in water. To perform this test, dissolve a small sample of dry chemical in water. Using a 9-volt conductivity tester will determine whether a sample is conductive or semi-conductive. This data is especially helpful when following a flowchart, and is the most useful for identifying ionic compounds.
Solubility
All samples can be divided into two fields--soluble and non-soluble. Water is used to perform this test.
- Soluble Samples: sodium acetate, sodium chloride, sodium hydrogen carbonate, sodium carbonate, lithium chloride, potassium chloride, calcium nitrate, glucose, sucrose, magnesium sulfate, boric acid, ammonium chloride
- Non-soluble Samples: calcium sulfate, calcium carbonate, cornstarch
A word of caution: every compound has a unique solubility product constant (Ksp), which indicates the amount of compound that can dissolve in a given volume of water before it reaches a point where no more of that compound can dissolve in the solution. This is called saturation. Because of this, it may be possible for a powder to appear to not be dissolving in water if there is too much of it and not enough water. Be careful of this when observing solubility, and, when in doubt, go for using smaller quantities of the sample.
Polymers
Methods of Identification
- Burn test--fibers and hair only
- Density in liquids--oil, water, alcohol, etc.--plastics
- Microscope--useful for distinguishing different hairs and fibers
Hints Burn tests for fibers, when permitted, will usually be done with a small candle (Bunsen burners are too hot). Burn tests on plastics will not be permitted at the event, but burn test results may be provided. If not, it is important to know densities and other identifying properties. Common liquids used to test plastic densities include water, vegetable oil, isopropyl alcohol, and NaCl solution (10%, 25%, and saturated).
Plastics
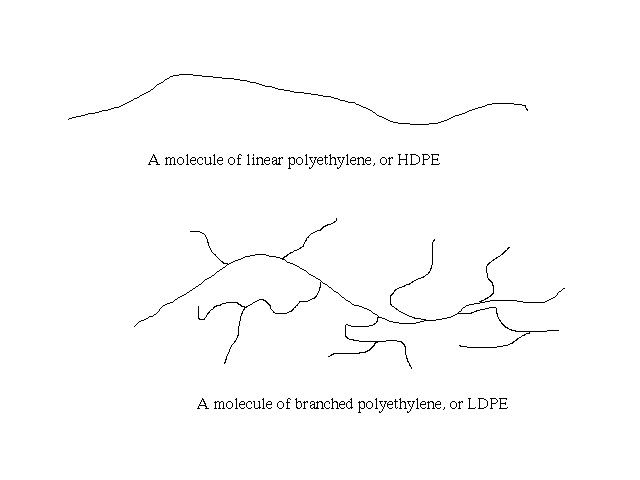
Just to clarify how LDPE differs from HDPE:
(Lines represent the connected ethylene monomer units)
Fibers
There are three types of fibers: animal, vegetable, and synthetic/man-made. Each of these types of fibers behaves differently in different tests, but generally, fibers of the same type will react in a similar way.
Burn Test
- Animal fibers shrivel but don't melt
- Synthetic fibers melt and shrivel; loose ends fuse together
- Vegetable fibers do not melt or shrivel, but they ignite easily and usually appear charred after being burned.
Other Useful Facts
- Animal fibers dissolve in bleach, but the other types will not react at all (nice to know although the bleach test isn't available during competition)
- Smoother fibers are more likely to be synthetic
- Synthetic fibers are generally uniform in thickness, whereas natural fibers vary.
Individual Fiber Information
| Name of Fiber | Type of Fiber | Fact About Fiber Type | Burn Test Results | Microscopic View |
|---|---|---|---|---|
| Wool | Animal | Most commonly used animal fiber | Shrivels, leaves a brown-black residue, smells like burning hair | Cylinder with scales |
| Silk | Animal | Smoother than wool | Shrivels, leaves a black residue, smells like burning hair | Thin, long, and smooth cylinder |
| Cotton | Vegetable | Most widely used plant fiber, fairly short fibers | Burns with a steady flame, smells like burning paper, able to blow flame from a thread like a match, leaves a charred whitish ash | Irregular twisted ribbon |
| Linen | Vegetable | Fibers generally longer and smoother than cotton | Burns at a constant rate, does not produce smoke, smells like burning grass, produces sparks | Smooth, bamboo-like structure |
| Polyester | Synthetic | Fibers can be any length | Melts, only ignites when in the flame, drips when it burns and bonds quickly to any surface it drips on, produces sweet odor and hard, colored (same as fiber) ash | Completely smooth cylinder |
| Nylon | Synthetic | Long fibers | Curls, melts, produces black residue, smells like burning plastic (some sources say it smells like celery?), ignites only when brought into flame | Fine, round, smooth, translucent |
| Spandex | Synthetic | Can stretch to eight times its original length | Melts quickly | Flattened, ridged fibers, clustered |
Hair
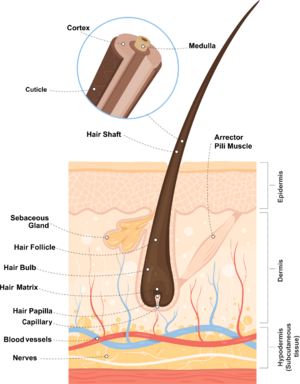
Hair is typically divided into two main parts: the hair shaft (the fiber that emerges from the skin) and the hair follicle (which is embedded in the skin). The hair follicle is also known as the bulb or root when it is removed from the skin, and is responsible for the growth of hair. The hair follicle is the only part of hair considered to be alive, since it is the site of all the biochemical activity in the hair. There are also other structures associated with the follicle such as sebaceous (oil-producing) glands and muscles which make the hair stand on end. The shaft can be further divided into three layers called the cuticle, cortex, and medulla.
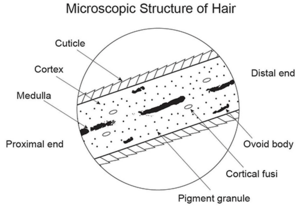
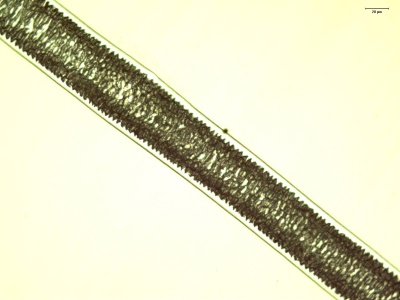
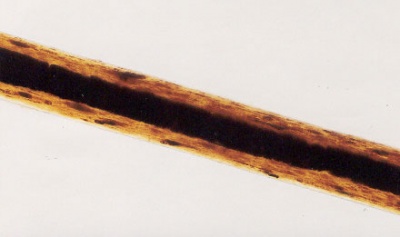
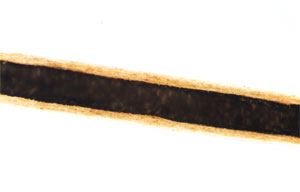
The medulla is the innermost layer of the hair, and may or may not be present in some hairs. This region of the hair lacks the same structure that is present in the outer layers, and it is one of the most fragile layers of hair. The role the medulla plays in the hair is unclear, but recognizing certain characteristics of the medulla is essential to identifying hairs. Human hairs can have three different medulla types: fragmented, interrupted, or continuous. Fragmented medullas are the most broken pattern, and appear more like a dashed line with many gaps and fragments. Interrupted medullas will have breaks, but will be much less broken than fragmented medullas. A majority of the medulla is connected, and the gaps are small. Continuous medullas have no breaks. Human hair may also lack a medulla entirely. Animal hairs typically have thicker medullas, and can have two additional patterns called ladder or lattice. Squirrel hair is a good example of a latticed medulla. Hairs can also be characterized by the medullary index. This is measured by taking the diameter of the medulla and dividing it by the diameter of the hair as a whole. Humans typically have a medullary index of less than 0.3, while animals typically have a medullary index of greater than 0.5.
The cortex is the second layer of hair, and it is the most structurally complex of the three. The cortex gives hair its color and shape, and is also responsible for water uptake and nourishing the hair. The pigment that gives hair its color is melanin, which is the same pigment responsible for coloring skin. Melanin is found in pigment granules, which in humans tend to be distributed towards the cortex. In animals, most of the pigment is found closer to the medulla. The cortex also contains ovoid bodies, which are oval shaped structures commonly found in cattle and dog hairs (though they may also be found in human hairs). Cortical fusi are irregular air-filled pockets found near the root of human hair, though they may be present elsewhere in the shaft.
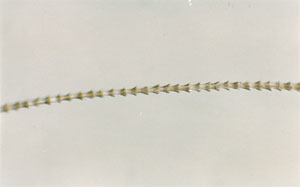
The cuticle is the outermost layer of the hair, and is responsible for the scale-like pattern on the outside of a strand of hair. The cuticle of the hair is responsible for protecting the inner layers and repelling water. The cuticle can have a variety of patterns that are useful for identifying hairs. Coronal scales are present on the hair of bats and rats, and they look like stacked cups or "strawberries on a stick". Spinous scales are present on cat hairs, and have points that are rounded at the ends. Imbricate scales are found on human hairs, where the scales are more rectangular and flat in shape. Many mammals also have hairs with imbricate cuticles.
Hair grows in three stages: the anagen, catagen, and telogen phase. Occasionally a fourth phase is included known as the exogen phase, but this is largely just an extension of the telogen phase. The anagen phase is the first phase, and is also known as the growth phase. In this phase the hair grows around 1 cm per month for around three to five years. A majority of hairs (around 85-90%) on the head are in the anagen phase. The next phase is the catagen phase, also known as the transitional phase. This phase lasts around two weeks, during which the follicle shrinks and the hair is cut off from its blood supply. This forms a club hair, and causes the hair to enter the telogen phase. In this phase (also known as the resting phase), the hair is dormant and anchored in by epidermal cells lining the follicle. The follicle will eventually begin to grow again, causing the anchor point of the shaft to soften and the hair to be shed. The exogen phase is the process of shedding the hair, while the telogen phase is the hair laying dormant.
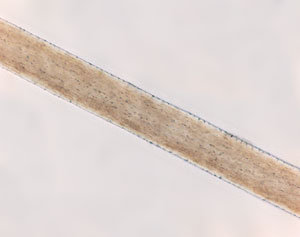
There are five types of hair to know for competition: human, squirrel, cow, horse, and bat hair. While burn tests may be performed, the best way to distinguish hairs is to examine them under a microscope.
Chromatography
- See also: Crime Busters#Chromatography
There are several types of chromatography, but only two will likely be covered in competition: paper chromatography and TLC (thin layer chromatography). While paper chromatography is just paper, and TLC is a glass slide with a thin silica (SiO2) or alumina (Al2O3) layer, they both do the same thing, and you can set both up using the same process. There are plenty of youtube videos out there that can show how to set it up. Basically, chromatography is used to separate the chemicals within a substance, allowing identification between seemingly similar substances.
There is also ink chromatography and juice chromatography. Likewise, both are set up the same way, but with juice chromatograms. The sample must be applied to the paper or TLC slide by another instrument, such as a toothpick.
Other types of chromatography include gas chromatography (where gases like helium or nitrogen are used to move the gaseous mixture through absorbent material and is used to analyze volatile gases) and liquid chromatography (where liquids dissolve ions and molecules and which is used to analyze metal ions or organic compounds in solutions.)
Most competitions ask for Rf calculations. Rf is the retention factor or rate of flow. A high Rf value means the solute has a high affinity for the mobile phase (the phase that moves; ex: solvent in paper chromatography), and a low Rf value means the solute has a high affinity for the stationary phase (the phase that does not move; ex: paper in paper chromatography).
Formula: [math]\displaystyle{ R_f=\frac{p}{s} }[/math] where the variable "p" is the distance the pigment (the ink or juice) travels and the variable "s" is the distance the solvent (usually water or acetone) travels.
Mass Spectrometry
Mass spectrometry is an analytical method used to determine the mass to charge ratio of charged particles.
The mass spectrogram of dodecane is shown to the right:
A few things to note about the mass spectrogram of dodecane:
- The y-axis is a measure of the percent abundance
- The x-axis is the m/z ratio (molar mass)
- The lines are known as peaks
How Mass Spectrometry Works
The device used to perform mass spectrometry is called a mass spectrometer. The three main parts of a mass spectrometer are the ionizer, the analyzer, and the detector.
The ionizer converts portions of the samples into ions. This is especially important because the analyzer generally consists of electric fields or magnetic fields, or both. In order for these fields to analyze and separate the compound into components of varying masses, these fragments need to be charged, or ionized, which is exactly what the ionizer does. These fields exert electric and/or magnetic forces on the charged particles, deflecting them towards the detector, which picks up on their presence. The amount of deflection that each particle experiences is inversely proportional to its mass, so lighter particles experience more deflection while heavier particles experience less. The detector also picks up on the number of particles of each mass recorded, which calculates its percent relative abundance. Higher relative abundances will result in taller peaks on the spectrogram.
Example Scenario
Here's an example using the schematic to the right and the example spectrogram that should be the result below it: the most common isotope of carbon dioxide has a molecular weight of 44 g/mol. The device should break up each molecule of carbon into its smaller fragments, as shown with the first three peaks for [C]+, [O]+, and [CO]+.
However, given the chemical structure of carbon dioxide consisting of a carbon in the middle of and double-bonded to two oxygen molecules, it should be less likely for the field to be able to separate such ions in the first place (this is where some organic chemistry knowledge of how structures work comes in handy). This is reflected in the spectrogram, which shows a tall peak and thus a high abundance of fully intact ionized particles ([CO2]+) at 44 m/z - which matches the molecular weight of carbon dioxide. Notice an extremely small, perhaps barely visible peak at 45 m/z - that represents an isotope of carbon dioxide with carbon-13 rather than carbon-12. These isotopes will exist, but in a very small quantity, hence why a peak shows up there.
The molecular ion peak, which reveals the approximate molecular weight of the compound being analyzed, should be the rightmost peak because it represents the particles of the highest mass, which are generally the particles that remained intact during ionization. Its relative abundance is generally dependent on the structure of the compound, because if the compound cannot easily be broken apart, then there will be a higher abundance (and thus a taller peak) at the relatively highest recorded m/z, and vice versa: if the compound is able to be broken apart more easily, then there will be a lesser abundance (and thus a smaller peak) at the relatively highest recorded m/z.
Reading Mass Spectrograms
1) Search for a molecular ion peak first. It may not always be present, but it is the peak with the highest m/z ratio. The Nominal Molecular Weight (MW) is a rounded value assigned to the molecule representing the closest whole number to the molecular weight. This value is even if the compound being analyzed contains simply Carbon, Hydrogen, Oxygen, Sulfer, or Silicon. The value will be odd if any of these elements are combined with an odd number of Nitrogen.
2) Attempt to calculate the chemical formula, using isotopic peaks and using this order: Look for A+2 elements: O, Si, S, Cl, Br; Look for A+1 elements: C, N; And then: "A" elements: H, F, P, I. From looking at the isotopic peaks, it is possible to determine the relative abundance of specific elements.
3) Calculate the total number of rings plus double bonds: For the molecular formula: CxHyNzOn rings + double bonds = x - (1/2)y + (1/2)z + 1
4) Try to determine the molecular structure based upon abundance or isotopes and m/z of fragments.*
- *Note: it is often not always possible to determine the exact molecular structures of compounds solely based on mass spectroscopy, even though it is possible to make very good educated guesses depending on how much information is given in the problem. Lots of potential fragments that may be detected will potentially have very similar molecular weights. For example, diatomic oxygen has a molecular weight close to 32 g/mol, and elemental sulfur also has a molecular weight close to 32 g/mol. Theoretically speaking, if either of these were a fragment broken off from an analyzed compound, and it shows up as a peak on the spectrogram, it is technically not possible for the mass spectrometer to tell which particular fragment it may be, since it can only give information about its mass and nothing else.
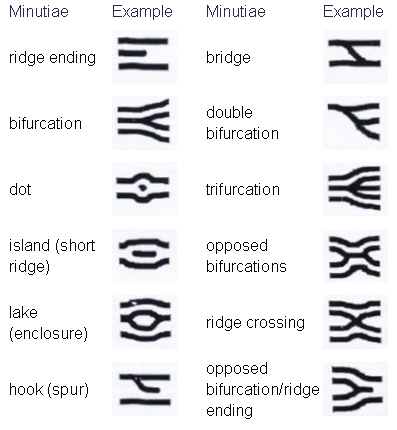
Fingerprints
Fingerprints are formed by the arrangement of volar pads. They are made mostly of sweat and water but can also contain various organic and non-organic compounds.
Patterns
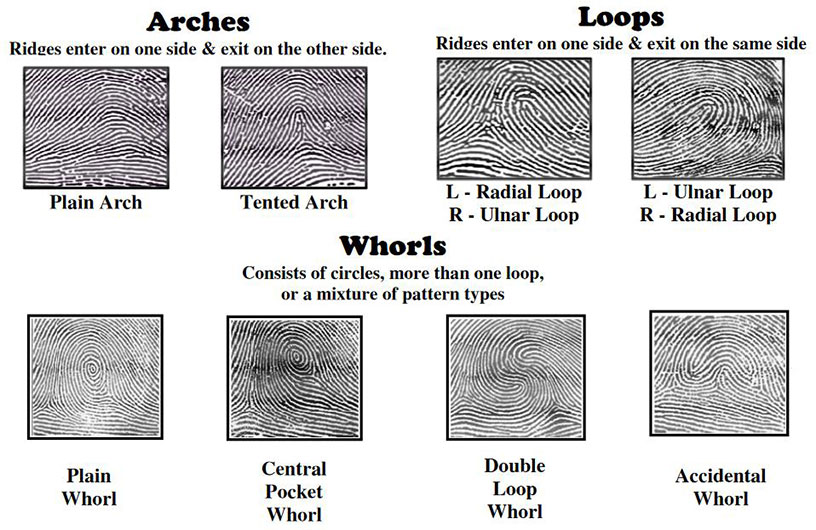
There are eight fingerprint patterns to know. They are:
- Plain Whorl
- Ulnar Loop
- Radial Loop
- Plain Arch
- Tented Arch
- Central Pocket Loop
- Double Loop
- Accidental Whorl
Whorls have two or more deltas. The presence of more than two deltas indicates an accidental whorl.
Loops have only one delta. The difference between an ulnar loop and a radial loop is that ulnar loops "enter and exit" on the side facing the pinky (the side of the wrist containing the ulna) while radial loops do so on the side facing the thumb (the side of the wrist containing the radius).
Arches have no deltas. Tented arches are easily distinguishable by the triangular core.
Types of Prints
Fingerprints can be in different forms when found.
- Visible/Patent: As the name suggests, these ones can easily be seen because they were made with a substance like ink or blood. They can also easily be photographed without development.
- Plastic: Made in soft material such as clay. Less easy to detect than visible fingerprints, but can still be photographed without development.
- Latent: Invisible fingerprints. These must be developed before photographed.
Methods of Development
Latent prints must be developed in order to be seen. There are various methods that can be used for latent print development.
Dusting
Powder applied to prints sticks to fatty acids and lipids. Generally, this method involves using a special brush, usually made of camel hair, to lightly spread the powder over the area where prints may be found, usually smooth or nonporous surfaces.
There are numerous different fingerprinting powders used in dusting, and their usages vary depending on the surface and the scene environment. For example, it would make more sense to use a dark-colored powder on a light-colored surface or a fluorescent powder on a dark-colored surface. The exact compositions of such powders vary, as most formulas are kept proprietary by their manufacturers.
Iodine Fuming
Self-explanatory by its name. It was one of the earliest methods of fingerprint development. The iodine reacts with body fats and oils in prints.
Ninhydrin
A chemical method that is useful for lifting latent prints on paper. It reacts with amino acids in prints and generally tends to result in the latent print pattern being a purple color.
Cyanoacrylate (Superglue) Fuming
Also self-explanatory by its name. It also reacts with moisture in the air as well as reacting with substances in the prints, forming sticky white material along ridges. Good for nonporous surfaces.
Small Particle Reagent (SPR)
Not as common as the other methods used, but still important. SPR is used for wet surfaces and reacts with the lipids present in fingerprints.
Other fingerprinting methods
Wetwop: a special pre-mixed liquid formula that is designed to lift latent prints on the sticky sides of adhesive surfaces (i.e. most kinds of tape)
Features
DNA
- See also: Heredity#DNA
Although many competitions simply require competitors to match DNA fingerprints, basic questions about the structure of DNA may appear on tests. DNA stands for deoxyribonucleic acid, and is composed of four nitrogenous bases: adenine, cytosine, thymine, and guanine. The base unit of DNA is known as a nucleotide, and is composed of a deoxyribose sugar, a phosphate group, and one of these four bases. These nucleotides link up, forming long strands of DNA. DNA is a double helix, made up of two strands that twist together. Because each DNA molecule is made up of two strands, the nitrogenous bases must pair together--adenine pairs with thymine, and guanine pairs with cytosine.
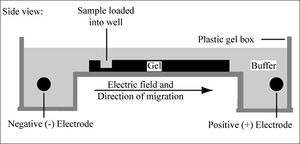
DNA fingerprints are created through a process known as gel electrophoresis. DNA molecules are placed into a box containing a buffer solution and a gel (typically agarose), as well as positive and negative electrodes. DNA is placed into wells in the gel, and the current is turned on. Because the DNA is negatively charged, it will migrate through the gel towards the positive electrode. Shorter DNA fragments travel further away from the wells through a process known as sieving. The agarose gel is a matrix, and it is much easier for the short fragments to move through the pores in the gel. Long DNA fragments will get caught and tangled, and stop moving as a result.
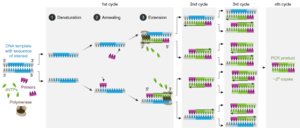
However, the DNA used in gel electrophoresis has to come from somewhere. Polymerase Chain Reaction (PCR) is a method of synthetic DNA replication used to amplify fragments of DNA for use in fingerprinting. It has three steps: denaturing, annealing, and synthesis/elongation. In denaturing, the DNA is heated to approximately 95 C in order to break apart the two strands so that new DNA can be created. In the annealing stage, the DNA is cooled to anywhere between 50 and 56 C so that a primer can be attached to the DNA strands. This primer is essential for the replication of DNA, which occurs in the final stage. During synthesis/elongation, new DNA is created using the primer as a starting point. An enzyme known as Taq polymerase creates a new DNA strand, using the starting strand as a template. Knowing that adenine pairs with thymine and guanine pairs with cytosine, it can put the nucleotides in the correct order and create a complete strand of DNA. PCR can be repeated for dozens of cycles, creating plenty of new DNA strands which can be used in forensic analysis.
Glass
The Rule to Remember!
If the glass's refractive index is the same or close to that of a liquid, then the piece of glass will not be visible in that liquid (use exact same liquids that are used for plastics)
Fractures
- Cracks end at existing cracks
- A small force forms circular cracks
- Radial cracks and conchoidal cracks make right angles but face different ways. When dealing with fractures, remember the 3Rs of glass fracture: Radial cracks at Right angles on the Reverse side of impact.
- A force very close to the glass before impact, such as a gunshot or a rock, will completely shatter the glass
Entomology
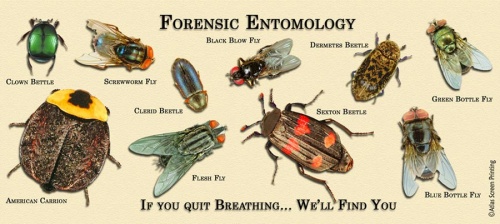
Stages of insects found on a dead body can tell how long the victim has been dead. The most common are the blowfly and the beetle. Blowflies appear first, within minutes or hours of the death. Flesh flies can arrive at the same time as blowflies but generally arrive slightly later. Certain amounts of time lapse between each life stage, which can tell this time. For example, if only maggots were found on the dead body, that means the victim probably died less than twenty-four hours ago. Beetles usually arrive well after the blow and flesh flies and are generally the last insect left on the body after months of decomposition. Mites are also generally present with these beetles initially because they help suppress maggots, and as such allow certain types of beetles.
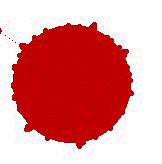
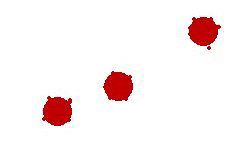
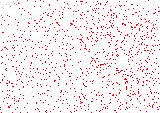
Blood Spatters
Blood Spatters are generally classified by the velocity at which they form.
Angle of Impact: The angle at which a spatter hits a surface. The formula for it is:
[math]\displaystyle{ \theta=\arcsin\frac{W}{L} }[/math]
Where theta (θ) is the angle, W is the width of the spatter, and L is the length.
Note that arcsin is also known as inverse sine.
Seeds and Pollen
In this section of the competition, almost no practice is needed. The participants must be able to compare the evidence from the crime scene to that which is found on the suspects. They may also be required to match certain types of seeds or pollens to a region of the nation or world, which is generally common sense. It is, however, helpful to have a general knowledge about various kinds of pollen and common regionally identifiable plants. This may include plants such as cotton or rice, which can only grow in specific climates.
Tracks and Soil
Tracks
In this section, most observations will be qualitative. Often, the only necessary action is to compare the given photographs to the track provided at the "scene." These tracks can be footprints or tire tracks, both of which can be identified by the tread that is left on the ground. Checking the pattern, shape, and size of each distinct part of the sole on a shoe is generally necessary to make a 100% accurate match.
Soil
Soil can be used as a way to possibly connect a suspect to the general area of the crime. For example, if the crime was committed at the beach (however unlikely it is), and one suspect had sand on him, then you could possibly infer that the suspect was near the scene of the crime.
Blood Typing
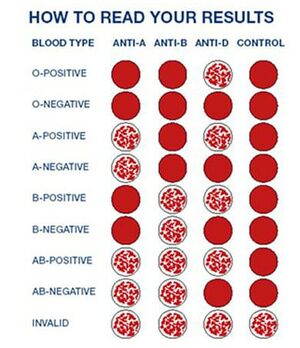
It is important to remember the ABO blood typing system when identifying a blood sample. There are four blood types in human blood: A, B, AB, and O. The ABO blood testing method is used to determine the blood type of any human. Using Antigen A and Antigen B serums, it is possible to find any blood type. If the blood reacts with the A antigen only, then it is type A. If it reacts only with B antigen, it is B type. If it reacts with both, then the blood type is AB, and if it reacts with none of the testing liquids, then it is O.
Bullet Striations
Bullet striations are pretty much just like tracks. Pretty much the only thing you have to do is try to match one of the suspects' bullet striations to that of the one found at the scene. This is essentially just matching pictures and is something you don't need to really study for.
Competition Strategies
- Although the lab and written portions of Forensics are weighted almost at an even 50-50, make it a priority to include lab practice with the substances themselves as part of competition preparation. Many experienced competitors cannot stress this enough as a key factor to success because even with the number of points you can earn from the Crime Scene Physical Evidence questions or even the Crime Scene Analysis essay, which are written, you'll still need to do well on the lab portion to score even higher. Plus, even the Crime Scene Analysis essay is usually dependent on the lab portion since you'd have to identify which powders were at the scene in order to get a better idea of who the suspect is.
- Make flowcharts (or develop a mental routine if that suits you better) while you observe the lab tests, especially for powders and plastics.
- Forensics is a very partner-dependent event. Most exams are so long that it is nearly impossible to finish without two people.
- Once you find out who your partner is, split the different skill areas with him or her however you wish and learn each of the areas you have so you can split the test accordingly when you go into the competition so you'll be able to get to most of the test. (Pro-tip: national medalist pikachu4919's favorite strategy is a powder/polymer split)


