Elastic Launched Glider
| Elastic Launched Glider | |||||||||
|---|---|---|---|---|---|---|---|---|---|
| Type | Engineering | ||||||||
| Category | Build | ||||||||
| Event Information | |||||||||
| Latest Appearance | 2021 | ||||||||
| Forum Threads | |||||||||
| |||||||||
| Official Resources | |||||||||
| Website | www | ||||||||
| Division B Results | |||||||||
| |||||||||
Elastic Launched Glider was a Division B event for the 2015 and 2016 seasons. It was a Division C trial event at the 2012 National Tournament and became a full-fledged Division C event in 2013 and 2014. However, in the 2019 season it returned as a Division B event. It then continued into the 2020 and 2021 seasons.
This event is a build event consisting of two parts: a glider made to be launched by the pulling and releasing of a rubber loop, which can be constructed based on plans of the competitor, or from a kit, and a flight log similar to that of other aviation events.
Terms to Know
One important part of this event which may confuse those new to it when reading Elastic Launch Glider threads on the forums is the terminology used, so here is a basic glossary of some terms you may want to know:
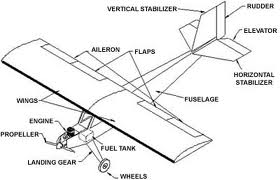
- Aileron: In short, the back edge of a wing of a glider (The edge closest to the tail). They can bend up or down to alter the glider's flight. The most distinct example of what it is is on the Time Machine model from the AMA site.
- Roll: The rotation of the glider upon the main axis of the wings that runs through the glider's center of gravity.
- Pitch: The rotation of the glider about the main axis of the fuse.
- Yaw: The rotation of the glider about the axis perpendicular to both the axis of roll and the axis of pitch.
- Fuse: Short for fuselage; the main body of the glider.
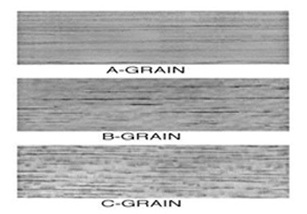
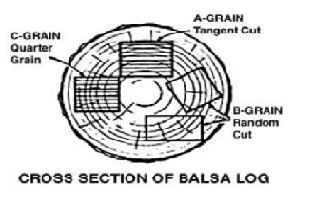
- A-Grain: A type of balsa used in gliders (see below). Its properties include it being softer are more malleable than other balsa.
- B-Grain: A type of balsa used in gliders (see below).B-grain balsa has a wide range of properties, as it is cut randomly from balsa stock, but in general it has properties which fall in the middle of whatever range they are in. Usually, B-grain is not used when A-grain or C-grain would do a better job.
- C-Grain: A type of balsa used in gliders (see below). Its properties include it being harder and more stiff than other balsa.
- Rudder: See vertical stab.
- Elevator: See horizontal stab.
- Stab: This is short for "stabilizer". It can refer to different parts of the glider, depending on who says it. In general, it refers to the whole of the tail of the glider; however, sometimes when someone says it they may only be referring to the horizontal stab or the vertical stab.
- Horizontal Stab: the horizontal part of the tail of the glider, is also called the elevator.
- Vertical Stab: the vertical part of the tail of the glider, also called the rudder.
- Incidence: The angle between the main axis of the wings of the glider and the horizontal stab. When talked about, the incidence is generally given as positive, with the wings tilted upwards when the horizontal stab is parallel with the ground, negative, with the wings tilted downwards when the horizontal stab is parallel with the ground, or 0-0, with the wings and the horizontal stab parallel with the ground at the same time.
- Flight Surface A general term for an aerodynamic surface such as a wing, vertical stabilizer, horizontal stabilizer, or a control surface such as a flap, rudder or elevator.
- Camber The curved shape given to the foam flaps. The greater the camber, the lower the trailing edge of the flaps. This will be a very important adjustment for best performance and can create more lift, but also more drag.
- Dihedral The “V” shape of the wings where the tips are higher than at the center. This helps with the lateral stability to cause the glider to attempt to roll to a more wings level attitude.
Construction
Detailed guide written by Chuck Markos and Tim Warren: https://scioly.org/gallery/albums/userpics/34432/elg.pdf
Materials
The glider is allowed to be built from any plan, published, student-devised, or otherwise. It can be built from wood, carbon fiber, glue, paper, and plastic flim only, with any non-metal malleable substance able to be used as ballast.
Balsa
Because of the fact that the Elastic Launch Glider must be able to withstand traveling at a very high velocity, but also must be aerodynamic, different types of balsa may need to be used so that the glider can transition from these two elements of its flight, depending on the design being used. One such type of design is the Time Machine, the plans for which can be found at the AMA glider website linked to below. The three types of balsa used are commonly called A-grain, B-grain, and C-grain. the definitions of these types of balsa are given above.
Incidence
A very major part of the construction of the elastic launch glider is the "incidence" (see terms above). In this scenario, the angle of incidence is the angle between the plane of the wings and the plane of the elevator (also know as the horizontal stab). Ideally, these two planes would be parallel, having an incidence of 0-0; a negative incidence (when the wings are at a negative angle of attack) leads to the glider taking a nose dive and a positive incidence (when the wings are at a positive angle of attack) leads to the glider flying back to the earth in an inside loop. However, it is incredibly hard to build the glider with enough precision to have the perfect incidence initially; thus, it is best to be able to adjust the incidence. The best way to do this is to make sure you glue the elevator to the fuse with CA glue so that it can be dissolved with acetone and re-glued at a better angle after having been tested.
The Launch
The glider launch is almost certainly the trickiest part of this event. There is a laundry list of things that might go wrong, and, unfortunately, many of these things result in the totaling of the glider. Therefore, launching the glider the first few times requires extreme caution, until you have developed a good technique.
Gripping the Glider
One very easy problem to fix, but one that could cause legitimate damage to the glider if not acknowledged, is how to grip the glider in the launch. With the simple simon design, one easy way to hold the glider is by gripping it from the top behind the wings, with your thumb on one side and fingers on the other, with no fingers going further than the plane of the bottom of the fuselage. This way, when the glide shoots upward out of your hand, the elevator goes beneath your fingers, and the rudder goes between the fingers and thumb, and no part of the tail is damaged.
Angling the Glider and Launch Handle
As stated in other parts of this article, the launching of the glider into the air is ballistic, not aerodynamic; i.e. the glider is not flying to the ceiling, it is being thrown there. However, it is very important to note that aerodynamics are involved in the ascent. If the glider were to be simply launched into the air without any thought, it would likely stall and fall back to the ground. Instead, the desired approach is to launch it in such a way that it aerodynamically corkscrews to the ceiling without stalling. The spiral will only contain a small number of rotations; maybe 1 to 1.5 turns (this is why it might be hard to observe in videos). Now, as each glider is different, the exact angle of launch will be different for success, but in general it goes like this:
- Hold the launcher in one hand and glider attached to the elastic loop in the other.
- Stretch the elastic the desired amount, and hold the system vertically. The elastic loop should be in a vertical line.
- Move the glider a small distance horizontally away from the launch handle. This way, the glider is less likely to hit the handle during launch.
- Tilt the system so that it is not vertical but 70 to 80 degrees in respect to the ground. This is so the the glider does not go straight up and thus can transition into its glide.
- Roll the glider (rotate it about the axis of the fuselage) about 45 degrees. Make sure to roll the launch handle (i.e. rotate your wrist of the hand with the launch handle) the same amount! This is what gives the corkscrew ascent.
- Launch and pray.
Controlling the Launch Height
A common question to be asking is "How do I control how high my glider goes when I launch it?" What definitely should NOT be done in a competition is to pull the elastic back a probable amount and wing it (pun entirely intended), hoping that this random launch will get the glider close-ish to the ceiling. This method leaves far too much room for error on the day of the competition.
A far better method of controlling the launch height is a process called "shortening". To do this, start with a relatively loose loop of elastic that, when stretched as far back as possible, does not get the glider all the way to the ceiling. Once at the competition area, test-launch by pulling this loose loop back as far as possible, and launching the glider. If the glider does not make it as high as desired, shorten the elastic, perhaps by looping it around the launch handle, and launch the glider again by pulling the elastic back as far as possible. Repeat this process until the glider ascends to the desired height.
The Flight
Because of how the event is set up, gliders of this event are called "free flight gliders". That is to say, the only control the competitors have in its flight is the launch; after that, the glider is on its own. Therefore, it is good to know what a flight should look like, and how that translates into the design of the glider.
Flight Outline
As mentioned above, the flight of a glider is largely in two parts: the initial, high velocity ascent, and the descent, which needs to take as much time as possible. The ascent, although largely ballistic, does need to have some aerodynamics involved. If the glider isn't launched in the right way, it will stall and take a backwards loop into the back of your head. More information about how to launch the glider so that it ascends smoothly can be found in this page's "Launch" section. The glider's descent is controlled by three key factors, which are in turn controlled by corresponding elements of the glider's design. For more information on this, read on.
Freeflight Trimming
There is a wonderful, much-more-in-depth article about this on the AMA website linked to below; please go and check it out. However, here is a decent summary of freeflight trimming:
As mentioned above, the elastic launched glider is what is known as a freeflight device. Because of this, it is essential to know which parts of the glider control which parts of its flight in what ways so that the glider can be designed to fit the specific demands (which, by the way, will change with the different sizes of flight rooms, so make sure you are able to alter the design of the glider slightly after it has been built, perhaps by using glue dissolvable in acetone).
The three main movements of the glider are the rotations of roll, pitch, and yaw. The definitions for these terms are given above, but to clarify further, it helps to think of a x-y-z axis, with the origin point at the glider's center of gravity. If the glider is held parallel to the ground, the z axis runs through the fuse, and the x axis runs through the wings. Rotation about the z axis is roll, rotation about the x axis is pitch, and rotation about the y axis is yaw.
Roll
Tilting of the glider to the left and to the right about the axis of the fuse would be classified as roll. The part of the glider that controls roll is the ailerons. Altering the ailerons most directly effects the glider's roll.
Pitch
Tilting of the nose of the glider up or down is what would be called pitch. Pitching of the glider in the air is most directly controlled by the glider's elevator. If the glider is pitching upwards and stalling, or pitching downwards and nosediving, the best way to fix it would probably be to adjust the elevator.
Yaw
Turning of the glider towards the right or the left in air is yaw. This is a very important part of this event, because, as it is indoors, the glider needs to circle downwards, and this circling is yaw. The main control for yaw on the glider is the rudder. As competitions can occur in different sizes of rooms, and the ideal setup is to have as large a circle for the descent as the room will allow, it is very important to be skilled at adjusting the rudder to change the magnitude of the yaw.
In Conclusion
Once you have developed good launching technique, this freeflight trimming is very important. The goal is to have the glider fly steadily but also slowly, in a large spiral to the ground. It will take some adjusting of the parts which control roll, pitch, and yaw, but if you know which parts these are, it becomes a matter of simple diagnosis of the problem and editing of the glider until the descent is to ideal standards.
Troubleshooting
When it comes to freeflight trimming, it is oftentimes quite difficult, especially as a beginner, to determine exactly why the glider is not gliding properly, and what can be changed, either about the glider or about the launch method, to fix it. Below is a list of various problems that can occur, and potential solutions to them.
- The nose starts dipping up and down (Stall): Simply add some weight to the nose, or if this is not desired, bend the the elevators down. The latter is risky because it creates negative incidence, which is bad for the design.
- Nosedives immediately after its transition: This is probably an issue with incidence. Try bending the trailing edge of the elevator upwards a little (be careful, though... too much bend and the glider will loop backwards instead). Try this.
- Flips backward it its transition and loops backward before going into a glide (or doesn't make it into a glide at all): This is most likely an incidence problem. Try bending the trailing edge of the elevator downwards a little (be careful, though...too much bend and the glider will nosedive instead, which is generally more likely to cause damage to the glider). Another thing that might help is simply launching the glider at less steep an angle.
- Is not turning properly (it flies straight in its glide instead of gliding in circles): To fix this, the easiest thing to do is probably going to be to carefully remove the glider's rudder, and reglue it at more of an angle. To get it to turn in a left-hand circle, glue it so that the front end of the rudder is further to the left than the back end. Reverse this if a right-hand circle is desired but do not add weight to one wing, as this messes up the center of gravity, and isn't very effective.
Resources
One incredibly helpful website which covers almost all aspects of this event can be found here (this is the aforementioned AMA glider website). The 2012 Forum thread which can be found here lays down much groundwork for the event. Also, when searching for videos for this type of glider, be sure to try searching "Catapult Launch Glider", which is another name for this project.
Also, do check out http://www.grc.nasa.gov/WWW/k-12/airplane/short.html. Its superb for understanding the what happens during flight and you need a middle school level of algebra to understand what they're talking about.
Kits
Four kits which are relatively easy to build, fit the 2018-2019 specifications, and will produce decent to very good gliders (depending on the build itself) are:
- Freedom Flight Models: This is just the Freedom Flight website; obviously, it is the glider that you want.
- Guru Engineering Tech: Has 2019 glider kits available.
- Retro RC: Has scholastic glider kits based on the design by Charles Markos.
- J&H Aerospace: Protege and Super Protege gliders legal for 2019/2020 rules
- Science Olympiad Little Sweep: Unfortunately, Stan is no longer supplying Science Olympiad kits.
Plans
Specifications
Nationals Scores
| Place | School | Score |
|---|---|---|
| 1st | Tower Heights Middle School | 134.7 |
| 2nd | Community Middle School | 130.3 |
| 3rd | Albuquerque Area Homeschoolers | 120.3 |
| 4th | Evergreen Middle School | 108.6 |
| 5th | Kennedy Middle School | 105.9 |
| 6th | Kraemer Middle School | 103.1 |
| Division B: Helicopter Egg Drop | Division C: MagLev · Elastic Launch Glider |


