Trajectory
- This article is about the event Trajectory. For the event Air Trajectory, see Air Trajectory.
| Trajectory | |||||||
|---|---|---|---|---|---|---|---|
| Type | Engineering | ||||||
| Category | Build | ||||||
| Description | Prior to the competition, teams will design, construct and calibrate a single device capable of launching projectiles onto a target and collect data regarding device parameters and performance. | ||||||
| Event Information | |||||||
| Participants | 2 | ||||||
| Latest Appearance | 2023 | ||||||
| Forum Threads | |||||||
| |||||||
| Official Resources | |||||||
| Division C Website | www | ||||||
| Division B Results | |||||||
| |||||||
| Division C Results | |||||||
| |||||||
Trajectory is a Division C event for the 2022 season in which participants must make a device that is able to launch a tennis ball, racket ball, ping pong ball, or hacky sack, powered by a non-metallic elastic solid. The device should fit in a 70cm by 70cm cube for Division B and a 60cm by 60cm cube for Division C. The event was last run for both divisions in 2014 as a trial event, and officially in both 2009 and 2010. The event was held in both divisions as Trajectory Contest in 1984.
Competition
The launch area in which participants must place their device is a 1m by 1.5m rectangle. They want the ball to hit a ground-level target between 2 and 8 meters for B division and between 2 and 8 meters for C division.
There are two targets at least 2 meters apart. Each target is either a 1m by 1m square or a 1m diameter circle. At the Regional level, targets are placed at 1-meter intervals. At the State level, targets are placed at 1/2 meter intervals. At the National level, targets are placed at 10 cm intervals. You must tell the judges which target you are going to try to hit and when you are going to fire.
The closer target is on the ground and the farther target is directly above the closer target on the ground with a possible movement to the right or left of up to 2 m (interval of 0.5 m for Regionals, 0.25 m for States, and 0.10 cm for Nationals) The goal is to be able to hit both targets and be accurate. When scoring, you want to get the most amount of points.
Four graphs and tables must also be turned in, worth 100 points each. Your target score is the number of millimeters from the center of each target. Penalties are also given for not wearing safety goggles, being inside launch area during launch, the part of the device being outside of the 70cm (for B) or 60cm cube (for C) before or after launch, and the device being outside of launch area. A 100 point penalty is added when any of those occurs."
Advice
The key to Trajectory is imagination. A basic catapult with little adjustability will get you nowhere, your best bet is to either dream up something on your own or find a basic design with lots of adjustability. A good idea is to take a PVC tube and drill slits in the sides, and then holes in the top. Slide a metal bar through the slits, loop elastic material around it, then drop a tennis ball into the top. Find something to sit in one of the holes at the top to keep it from launching. When you pull out your release device at the top, the tennis ball will shoot out.
Device
Design Stage - Two possible ways for the ball to be propelled toward the target are:
- You can push the ball down a guide tube or guide rail (sort of like a cannon)
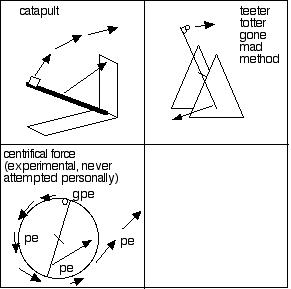
- You can use a swinging arm like a catapult.
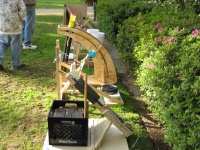
A swinging arm style catapult was used by the winning Trajectory team at Nationals in 2008. If you look up trebuchet or catapult on any search engine you will find a tremendous amount of information on possible designs. Keep in mind that as per the rules you would have to modify a trebuchet to use an elastic solid (rubber band, tubing, or bungee cord) as the power source. Also, keep in mind that most trebuchets and catapults were designed originally to have the maximum possible power and/or range. In this competition, range should not be an issue (since it is easy to get sufficient power in an 80cm cube device), but accuracy will be an issue. So look at the designs you see and possibly eliminate parts or design features that are there exclusively for extending power or range, in favor of design features that promote accuracy (consistency) and adjustability. You must have a way of adjusting the device to any possible range and height of target within the rules, and you need some means for making small corrections between shots.
The Pull Method
The swinging arm method can be adapted in many ways. Any method can be highly inaccurate and incredibly screwy if not well designed and constructed (which means when you are testing, you have too many variables to deal with and you will lose your ability to adjust the device predicably. It is extremely important to build a device that is sturdy and stable so that when repeatedly fired at the same setting it will shoot the same distance. In addition, you need an adjustment system that allows sufficient adjustability of power (and possibly launch angle) so that you can accurately set you device to hit any potential target (see above) ALSO, even if you have the best machine in the world, you need an aiming system to help you line up your device to the target. Any system that allows you to aim the device within the ultimate accuracy of the device can work. Some examples of aiming devices are: an adjustable pin/nail on each end of the device that is lined up with the target when the device is properly aimed so that it will hit the target, Any sort of rifle aiming system including scopes, iron sights and "legal" lasers (see the SO rules on lasers), even a simple small diameter tube aligned with the target could make an adequate aiming device for a trajectory device. During your calibration, you will need an accurate metric distance measuring device. A simple metric tape is completely adequate, but English (foot/inch tapes can be used as well is you don't mind converting the units to meters. You could also use a laser range finder for distance measuring as the price of these is now well under $100!
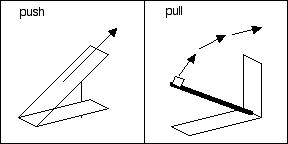
The pull method is shown in various configs below.
The Push Method
In the interest of being fair, I will give you an idea of how to make a good Push method device.
The main concept of the push method is to secure the elastic at two parallel points in front of where the projectile starts and then putting the elastic behind the projectile so that it will "push" it towards the target. One way to do this in order to make this process more accurate is to use a tube and to take a piece of wood, or a smaller PVC tube, to push the ball towards the target.
The Teeter Totter
The teeter-totter can be a good design, but if approached incorrectly, can result in failure. You should keep in mind a simple and reliable way to adjust your device so it can be corrected. This way you can be exact on both shots. Think about things that can be consistently adjusted a known amount and are simple enough so you don't make a mistake while adjusting the range or aim. Things like this may be elongated stims that correspond to a ruler or something to set your device at. Other ideas include compasses, rulers, lasers, gear systems, or other devices that can be used to set launch arms in place then can release at that point, etc.
Construction
Good solid construction out of wood, metal, or plastics, preferably very sturdy with glued and screwed connections and heavy bracing to keep the base from moving while launching. If your device is insufficiently heavy to keep from moving during launch then remember to leave a spot where you can put bricks or a 5 gal bucket of sand or two to keep it down (the device may slide forward so you may need to put rubber pads or some other high friction material on the bottom).
Elastic Power
Remember, your device must be powered by a non-metallic elastic solid. This means that the energy used to move the projectile towards the target must originate from elastics such as: rubber tubing, bungee cords, rubber bands, fishing poles, surgical rubber, and elastic material. However, both wood and string are considered non-metallic elastic solids. If using string, you could use torsion power (though this works better with rubber bands or hook-less bungee cords. Wood can be used in the way pictured in the link below:
http://gallery.scioly.org/details.php?image_id=1026
Testing Your Device
Test your device so you can make sure it works as stated in the parameters. Then test it at different temperatures and different humidities and so on since the device can be affected by all or any one of those factors. Do your main testing at conditions as close as possible to what is expected at competition. In some regional and state competitions, you may have to account for a wide range of temperatures and even wind speeds if the competition is outdoors, but Nationals is always done indoors in a controlled environment. Make sure you are on level ground and are exact.
Consistency and reliability are the most important characteristics to strive for. The ideal device should be at a point where it hits the target every time. A device that hit the target 1 time out of 3 is unlikely to beat a device that can hit the target 9 times out of 10. It is important as well that the device be sturdy enough so that once you have done your calibration, nothing will break or move (or you are likely to have to completely re-calibrate your device).
Tips
- Make sure you use something that will not stretch out a lot over time. Or if you must use something that will change over time make sure you have a few sets to use and rotate them so they are all the same. Look at some of the information on Wright Stuff is you want to more about the characteristics of rubber powered devices. If stretched near the limit, rubber will have a short lifespan but if well cared for it can be fairly consistent and durable. Putting Duct tape over the area where the rubber stretches the most is a good way to slow down the lifespan of the rubber.
- Make sure to put a ball(or whatever you are launching) in before you launch sometimes it can be easy to forget to reload it. An inadvertent launch will count as one of your 4 possible launches so you don't want to waste them.
- While in the testing box, be sure that you do not remove your goggles. Doing so will result in a large penalty.
- Make sure that you and your partner are always out of the launching box while launching which means hands and knees also.
- Try bringing a checklist and before you impound your Trajectory check that you have everything you need.
- Before you launch, make sure to notify the judges.
- Take your time- do not hurry to launch! Estimate where your projectile will land before launching.
Files
Links
New York Coaches Conference [1]
| Division B: Aerial Scramble · Amazing Mechatronics · Codebusters · Storm the Castle | Division C: Aerial Scramble · Amazing Mechatronics · Environmental Chemistry · Trajectory |


