Mission Possible/Lego Programming
Articles in this series
The following is a list of pages pertaining to Mission Possible for Division C. Some of these pages may contain outdated information.
- Main Article
- Documented Devices
- Useful Components
- Year-Specific Information
Introduction
Lego Mindstorms and NXT are very convenient, if expensive, ways to build a variety of robotic devices for events like Electric Vehicle, Robot Ramble, Robo-Cross, Robo-Billiards, and Mission Possible C. The programming language that these systems are shipped with, however, is entirely unsuited for serious competition. Third party text-based programming environments are widely availible, relatively easy to use, and are vastly more powerful than the provided systems.
NQC is an excellent programming language for Mindstorms. It will take a little while to learn, but the manual is good and the payoffs are enormous. A good programming environment can be found here while the actual NQC site can be found here. If you are using the NXT, substitue NBC or NXC for NQC, both of which can be found here
NQC and its brethren
This section is written specifically for NQC, but the code for programming the NXT is almost identical, so it should be easily translated.
Sensor Setup and Datalogging
- You should always "SetSensorType(SENSOR_#, SENSOR_TYPE_NONE)" for touch and temperature sensors. It is also useful for light sensors if you need to disable the red LED, which can hinder readings for the presence or absence of light. If you are trying to determine the color of an object, leave the TYPE as LIGHT and if you are using a rotation sensor, leave the TYPE as ROTATION.
- Regardless of the sensor type, use "SetSensorMode(SENSOR_#, SENSOR_MODE_RAW);". This will prevent the RCX from even thinking about using % for any of the readings, which lets you get more accurate results.
Using a datalogger program is an easy way to collect data in a format that you can then view in Excel to analyze for trends and peaks.
task main()
{
   CreateDatalog(0);  //clears the database on the RCX
   PlayTone(800,100);
   SetSensorType(SENSOR_1, SENSOR_TYPE_NONE); //sets sensor modes to a more useful setting
   SetSensorMode(SENSOR_1, SENSOR_MODE_RAW);
   PlayTone(200,100);  //indicates that logging is about to start
   CreateDatalog(1000); //creates a 1000 entry database
   while(true)
   {
   AddToDatalog(SENSOR_1); //collects sensor data into the database at an interval of 10ms
   Wait(10);
   }
}
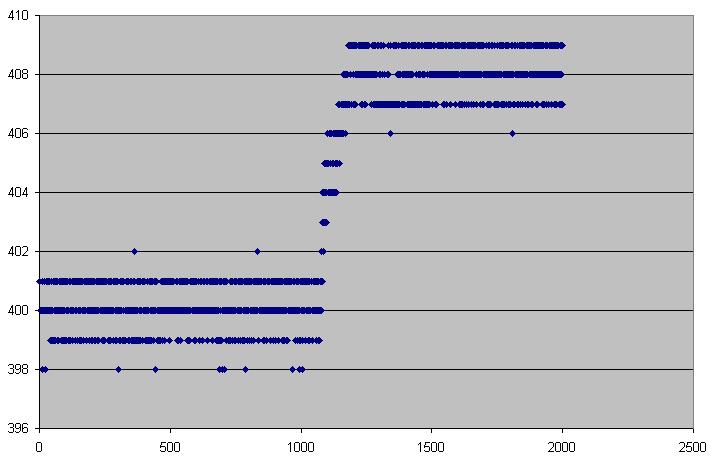
The following is the data from a 2000 entry Datalog that recorded the light sensor's reading of a chemical solution prior, during, and after adding a second component that created a precipitate: PrecipitateDatalog
The graph for this data looks like this:
You can see that, while there is a very distinct different between the pre and post-precipitation solutions, the numerical difference is relatively small. This means that you cannot simply rely on a variable you define at the beginning of the program to be accurate in a variety of environments. Slightly different lighting conditions would render static variables completely useless. The following code is a segment of code that allows the program to read the ambient conditions and then make a decision based on that data.
              repeat(50)
              {
                aa=(SENSOR_2+aa);      //sums the ambient readings and stores them as "aa"
                Wait(1);
              }
              precip1=((aa/50)+5);    //finds the average of the ambient conditions and adds 5
              ClearTimer(1);      //timer for resetting the precip dumper
              On(OUT_A);          //precip dumper motor
              until(SENSOR_2>=precip1)  //engages until solution has mixed
              precipmotor=(Timer(1)*10); //sets the reset time in the correct units
              Off(OUT_A);
              i=1;
           }
           if(SENSOR_2>=precip1 && j==0)    //precipitate is present
           {
             //next action
           }
After repeated data collection, it had been found that adding 5 to the average of the ambient conditions would always place the triggering variable well above any outliers in the ambient conditions, but low enough that the final precipitate solution would always trigger the next transfer. Reading the ambient conditions during operation and making decisions based on those conditions dramatically increases the reliability of your device, while sacrificing very little operating time (50ms is plenty of time to collect ambient data).
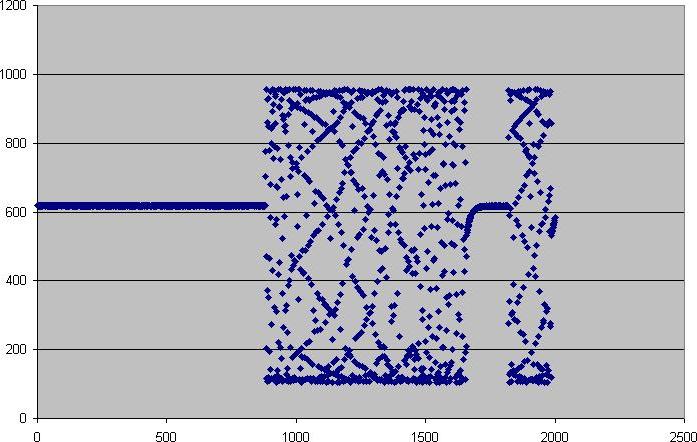
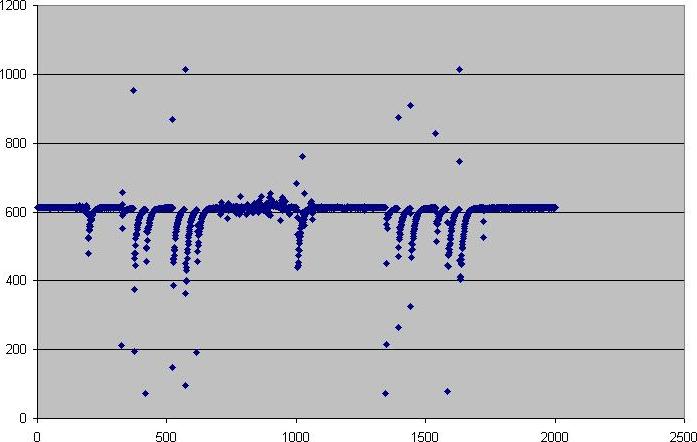
Another example is a device that relies on sound triggers for certain events. The following two graphs are of microphone in close proximity to a piezo buzzer that is intended to trigger an event and a person hammering in close proximity, respectively:
The difference in numerical values between white noise and when the piezo buzzer is activated is numerically tremendous. The hammering tends to have a much smaller range, but has widely varying outliers. Also note that the averaging approach previously mentioned would be completely worthless in this scenario. So if you thought you might be running your device in an environment with noises such as hammering, you would want to set the event to trigger at a level above 900 or below 200 to minimize the chances that exterior noises could trigger it. If that is not sufficient to ensure reliable operation, write your code to require that a significant number of datapoints are both above 900 and below 200 within a small timeframe (100ms). While the hammering does have outliers within those regions, it would not have enough within a short enough time period to create a false trigger, while the piezo buzzer would have no trouble generating a sufficiently dense triggering region.
Good Practices for using programmed devices
- Always include a copy of your code at device impound. If the judge doesn't want it, that's fine, but he might.
- At least one person present for the running of the device should be able to fully explain the code.
- Comment your code enough that a reader will at least get the general idea of what is going on.
- Be especially clear in your comments whenever you use a timer or wait(variable) command if the event prohibits certain time manipulations or parallel events.
- When you can, code the actions so that they trigger at variables that are dependent on the current environment, rather than a static number. What I mean by this is that you should try to include sections of code that let your machine adapt to the current light/sound/temperature conditions. Take a sample of the conditions and then have the transfer trigger whenever the sensor reaches "conditions + 5" or whatever is appropriate.


